
Installing Electric Cattle Fences: Step-by-Step Installation Guide
Installing an electric cattle fence correctly is critical for safety, performance, and long-term reliability. A well-installed system delivers consistent voltage, trains cattle quickly, and minimizes maintenance over time.
This guide walks you through the complete process of installing electric cattle fencing — from planning and layout to grounding, energizer setup, and final testing.
Overview: What You Need Before Installation
Before installing an electric cattle fence, ensure you have all required components and a clear installation plan. Electric fencing is a system — skipping or rushing steps often leads to poor performance.
- Fence posts (permanent or temporary)
- Fence wire, poly wire, poly tape, or poly rope
- Insulators and connectors
- Electric fence energizer
- Ground rods and grounding wire
- Fence tester or voltmeter
Understanding how these components work together as an integrated system is essential. The energizer generates electrical pulses that travel through the fence wire, while the grounding system completes the circuit when an animal makes contact. Each component must be properly selected and installed for optimal performance.
Step 1: Plan Your Fence Layout
Proper planning is the foundation of a successful electric cattle fence installation. Start by defining the purpose of the fence: permanent boundary, internal subdivision, or temporary rotational grazing.
- Mark fence lines and corners
- Identify gates and access points
- Determine number of fence strands
- Account for terrain, slopes, and water crossings
For cattle, single or multi-wire systems are common. Permanent perimeter fences often use multiple wires, while temporary systems rely on fewer strands. Consider your cattle breed, age, and temperament when determining wire height and spacing. Adult beef cattle typically require fewer wires than dairy cattle or calves.
Before beginning installation, walk the entire fence line to identify potential problem areas such as rocky soil, wet areas, or vegetation that may interfere with the fence. This planning phase prevents costly mistakes and ensures efficient installation. For more information on choosing between different fencing approaches, see our comparison of electric versus woven wire cattle fencing.
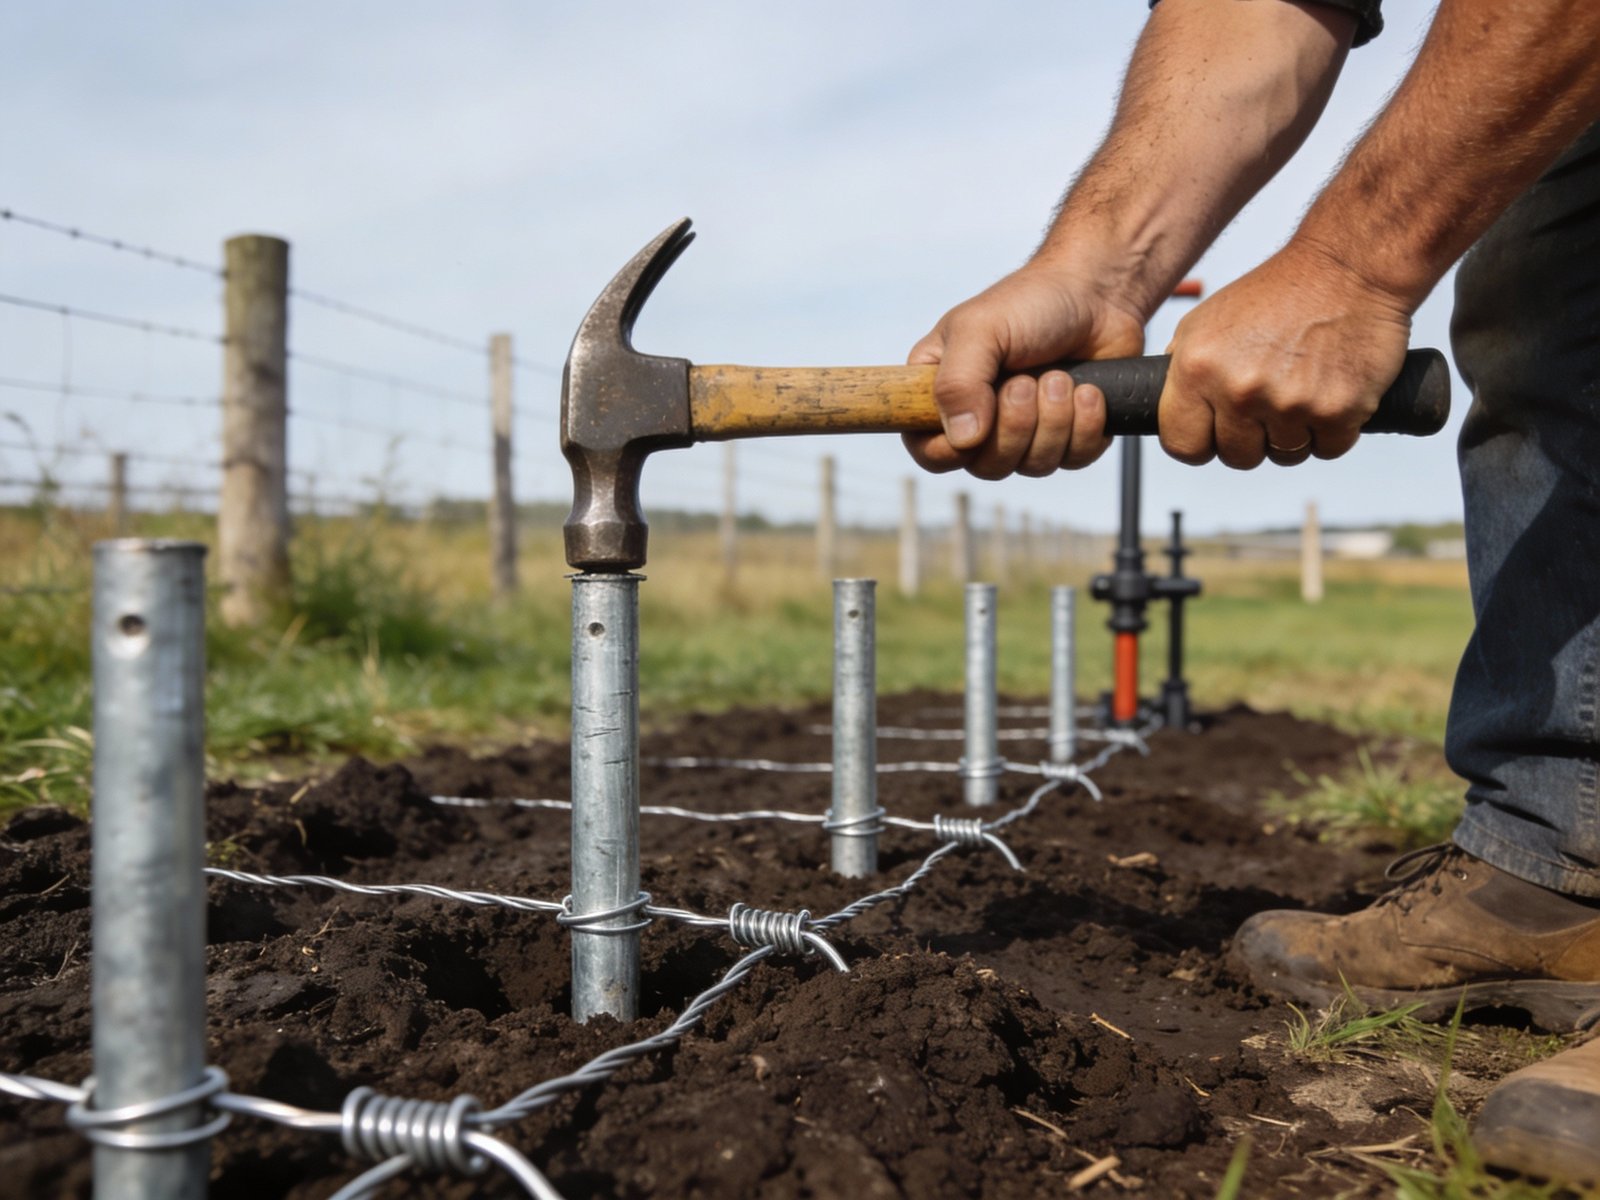
Step 2: Install Fence Posts
Fence posts provide the structural support for your electric fence. The type and spacing of posts depend on whether the fence is permanent or temporary.
Permanent Fence Posts
- Use wood, steel T-posts, or concrete posts
- Space posts 20–30 feet apart
- Install corner and end posts with bracing
Temporary Fence Posts
- Use fiberglass or plastic step-in posts
- Space posts 10–20 feet apart
- Ensure posts are firmly anchored
Straight, well-aligned posts improve wire tension and reduce long-term maintenance. Corner posts require additional bracing to withstand tension from multiple directions. When installing permanent posts, ensure they are set deep enough to remain stable. For temporary systems used in rotational grazing operations, step-in posts offer quick installation and easy relocation.
Step 3: Attach Insulators
Insulators prevent electrical current from leaking into fence posts. Always use insulators compatible with your post type and fence material.
- Use heavy-duty insulators for permanent fencing
- Match insulator size to wire or poly conductor
- Install insulators at consistent heights
Improper or missing insulators are one of the most common causes of fence power loss. Quality insulators withstand weather extremes and UV exposure without cracking or degrading. For detailed guidance on selecting the right insulators for your system, consult our insulator selection and installation guide.
When attaching insulators to posts, ensure they are securely fastened and positioned to hold the wire at the correct height. Loose or improperly installed insulators can allow wire movement, leading to shorts or reduced voltage.
Step 4: Install Fence Wire or Poly Conductors
Choose the fence conductor based on your system design:
- High-tensile wire: permanent perimeter fencing
- Poly wire or tape: temporary or internal fencing
Unroll wire or poly conductor carefully to avoid kinks. Attach it to insulators and maintain even tension along the fence line.
- Do not overtighten high-tensile wire
- Ensure consistent wire height
- Avoid sharp bends and contact with vegetation
Each conductor type has specific advantages. High-tensile wire offers excellent durability and conductivity for permanent installations, while poly tape provides high visibility for training cattle and temporary applications. Our wire and conductor material comparison explains the performance characteristics of different options.
Wire tension affects both structural integrity and electrical performance. Too much tension can break wires or pull down posts, while insufficient tension allows sagging that may contact vegetation or ground. Use a tension gauge to achieve manufacturer-recommended specifications.
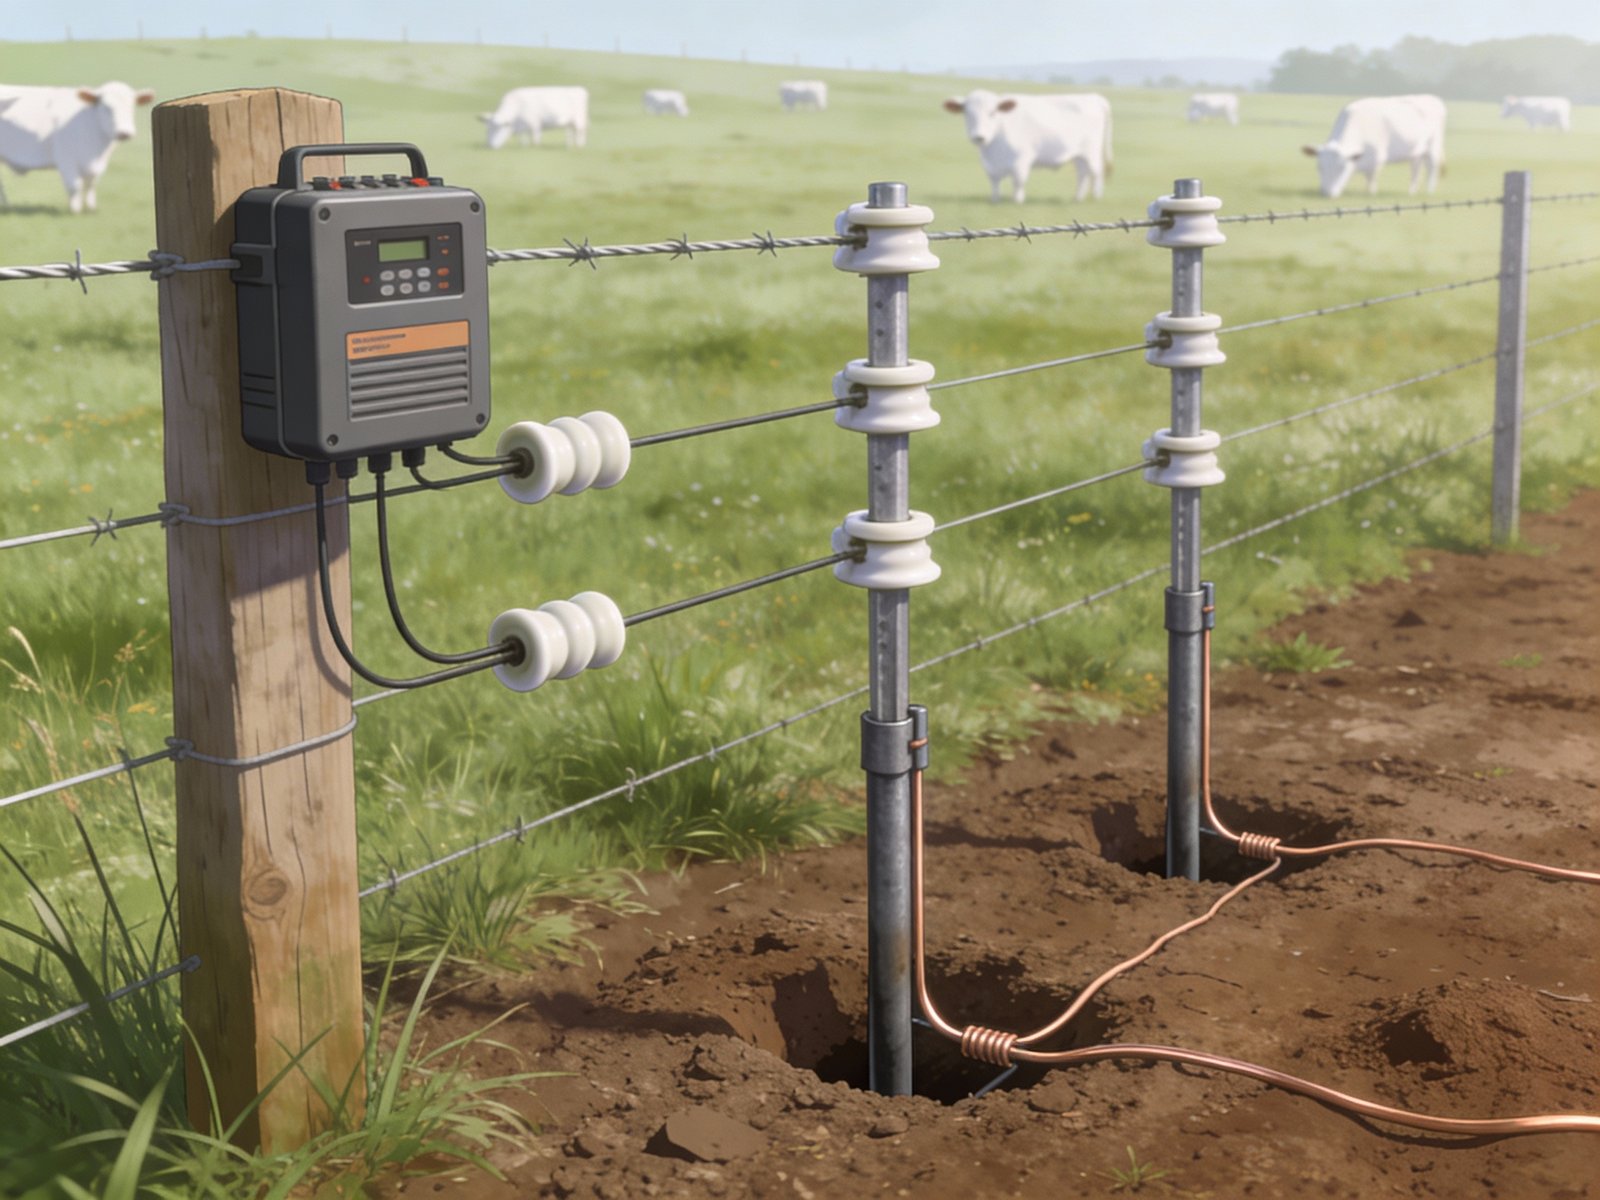
Step 5: Install the Electric Fence Energizer
The energizer is the power source of your electric cattle fence. Install it in a dry, protected location.
- Mount energizer on a wall or post
- Connect fence terminal to the fence wire
- Connect ground terminal to grounding system
Choose the energizer size based on fence length, vegetation load, and cattle type. Undersized energizers are the leading cause of fence failure. An energizer must have sufficient power to maintain adequate voltage along the entire fence length, even under heavy vegetation loads.
Consider power source options: AC-powered energizers provide consistent high output for permanent installations near electrical service, while solar and battery units offer flexibility for remote locations. Our comprehensive energizer power source selection guide helps you choose the right option for your operation.
When mounting the energizer, ensure adequate ventilation and protection from direct rain exposure. Follow manufacturer instructions for wire connections, using appropriate connectors and weatherproof terminals. Never operate an energizer with the cover removed or damaged, as this creates serious safety hazards.
Step 6: Install the Grounding System
Grounding is the most critical — and most neglected — part of electric fence installation. A poor ground equals a weak fence, regardless of energizer size.
- Install at least three ground rods
- Space rods 6–10 feet apart
- Drive rods fully into moist soil
- Connect rods with galvanized grounding wire
In dry or sandy soil, additional ground rods may be required for proper performance. Soil moisture directly affects grounding effectiveness. Install ground rods in locations that remain moist year-round when possible, avoiding areas that dry out completely during summer months.
Ground rods should be galvanized steel or copper-coated, typically six to eight feet long. Drive rods vertically into the soil, leaving only a few inches exposed for wire connections. Connect all rods in series using galvanized wire and approved grounding clamps. The grounding system must provide a low-resistance path for current to return to the energizer.
Proper grounding makes the difference between an effective fence and a frustrating failure. For detailed information on designing and testing your grounding system, see our complete guide to grounding system design and testing.
Step 7: Connect Gates and Fence Sections
Gateways must maintain electrical continuity while allowing access. Use insulated gate handles and underground cable to carry current across openings.
- Use insulated handles for safety
- Bury insulated cable at gate crossings
- Ensure all fence sections are electrically connected
Gate systems require special attention to maintain both electrical performance and safe access. Insulated handles allow gates to be opened without turning off the energizer. Underground cables should be rated for direct burial and installed in protective conduit where practical. For comprehensive information on gate design and installation, refer to our gate systems for electric fences guide.
Proper installation reduces future issues, but even well-built systems require routine maintenance and occasional troubleshooting as conditions change.
Step 8: Test the Fence Voltage
After installation, test the fence using a fence tester or voltmeter.
- Test near the energizer
- Test at the far end of the fence
- Check voltage under load
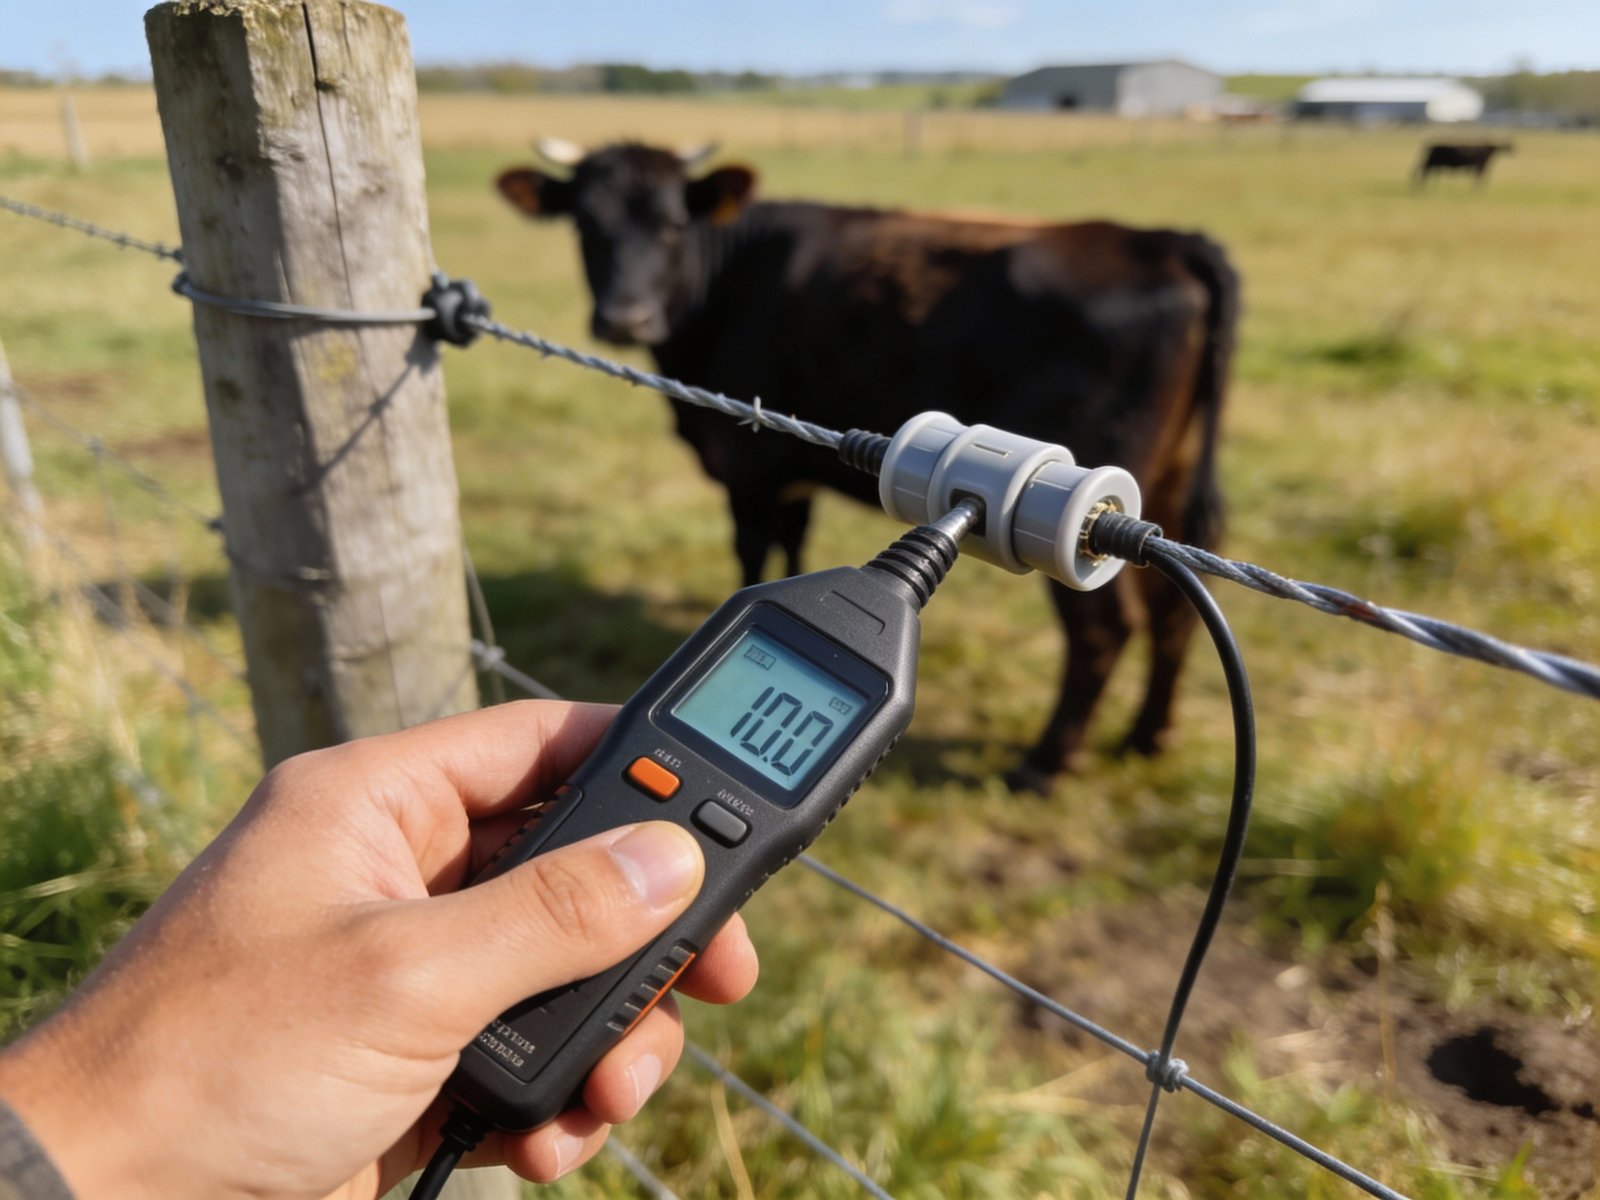
For cattle fencing, target voltage typically exceeds 4,000 volts. Lower readings indicate grounding issues, vegetation load, or poor connections. Test voltage at multiple points along the fence, not just near the energizer. Significant voltage drops between test locations indicate problems with wire connections, insulators, or excessive vegetation contact.
Perform a loaded voltage test by creating an intentional short to ground using a grounded metal object against the hot wire. This simulates an animal touching the fence and reveals whether the system can maintain adequate voltage under real-world conditions. The voltage should remain above 3,000 volts during this test for effective cattle containment.
Document your voltage readings at multiple locations during initial testing. These baseline measurements provide valuable references for future troubleshooting and maintenance. Regular voltage testing helps identify problems before they result in escaped cattle.
Step 9: Train Cattle to the Electric Fence
Cattle must learn to respect the electric fence. Introduce animals in a controlled environment where they can see and touch the fence safely.
- Ensure fence is fully powered
- Use visible conductors (poly tape if needed)
- Monitor cattle during initial exposure
Once trained, cattle typically respect electric fencing long-term. Initial training is critical for long-term success. Cattle that receive a strong, memorable shock during first contact learn to avoid the fence. Those that experience weak shocks or none at all may repeatedly test the fence.
Training works best in a small paddock where cattle can easily see the fence and have limited space to build momentum before contact. Some producers use temporary highly visible poly tape for initial training, then switch to less visible wire for permanent fencing. Young calves may require additional training as they grow and test boundaries.
For detailed training techniques and troubleshooting training problems, see our guide to training cattle to respect electric fences.
Common Installation Mistakes to Avoid
- Undersized energizers
- Insufficient grounding
- Poor insulator quality
- Ignoring vegetation management
These mistakes account for the majority of electric fence failures. Undersized energizers cannot maintain voltage along long fence runs or under vegetation loads. Insufficient grounding prevents proper circuit completion, resulting in weak shocks. Poor quality insulators crack, allowing current leakage. Vegetation contact drains voltage and can create dead shorts.
Additional common errors include using incorrect wire types, improper wire connections that create high resistance joints, and failing to plan for lightning protection. Each of these problems is preventable with proper planning and installation techniques. For a complete analysis of what to avoid, review our guide to common electric fence installation mistakes.
Before putting cattle on new fencing, verify that all system components meet safety and performance standards. Understanding regulations and safety compliance requirements protects both livestock and people.
Frequently Asked Questions
How long does it take to install an electric cattle fence?
Installation time ranges from a few hours for temporary fencing to several days for permanent systems. A single-strand temporary fence for rotational grazing can be installed quickly with step-in posts, while a multi-wire permanent perimeter fence requires post setting, wire tensioning, and careful system setup.
How many ground rods are required?
Most cattle fences require at least three ground rods, with more needed in dry soil. The number depends on energizer output, soil conditions, and fence length. High-powered energizers or installations in sandy or rocky soil may require four to six ground rods for adequate grounding.
Can electric fences be installed on uneven terrain?
Yes. Proper post spacing and wire height adjustments ensure consistent performance. On steep slopes, use additional posts to prevent wire sagging. In rolling terrain, adjust wire height at each post to maintain appropriate clearance from ground while keeping wire at effective height for cattle contact.
What voltage is needed to contain cattle effectively?
Minimum effective voltage for cattle is typically 3,000 volts, but 4,000 to 5,000 volts provides more reliable containment. Higher voltages deliver more decisive shocks that improve cattle training and respect for the fence. However, voltage alone is not sufficient—proper grounding and wire placement are equally important.
How often should electric fence voltage be tested?
Test voltage monthly during the grazing season and after any severe weather events. Regular testing identifies problems before they result in escaped livestock. Walk the fence line periodically to check for vegetation contact, damaged insulators, or loose connections that may reduce performance.
Next Steps
After completing installation, understanding ongoing system requirements ensures long-term success:
- Learn proper electric fence maintenance procedures to keep your system performing optimally
- Understand how to diagnose and fix problems using our troubleshooting guide
- Explore best electric fence systems for cattle to optimize your setup
- Consider cost analysis and ROI for expansion planning
Electric fencing performance varies with weather and seasonal conditions. Understanding these factors helps maintain effective containment year-round. For operations running multiple livestock species together, review our multi-species fencing considerations.