
Guide Contents
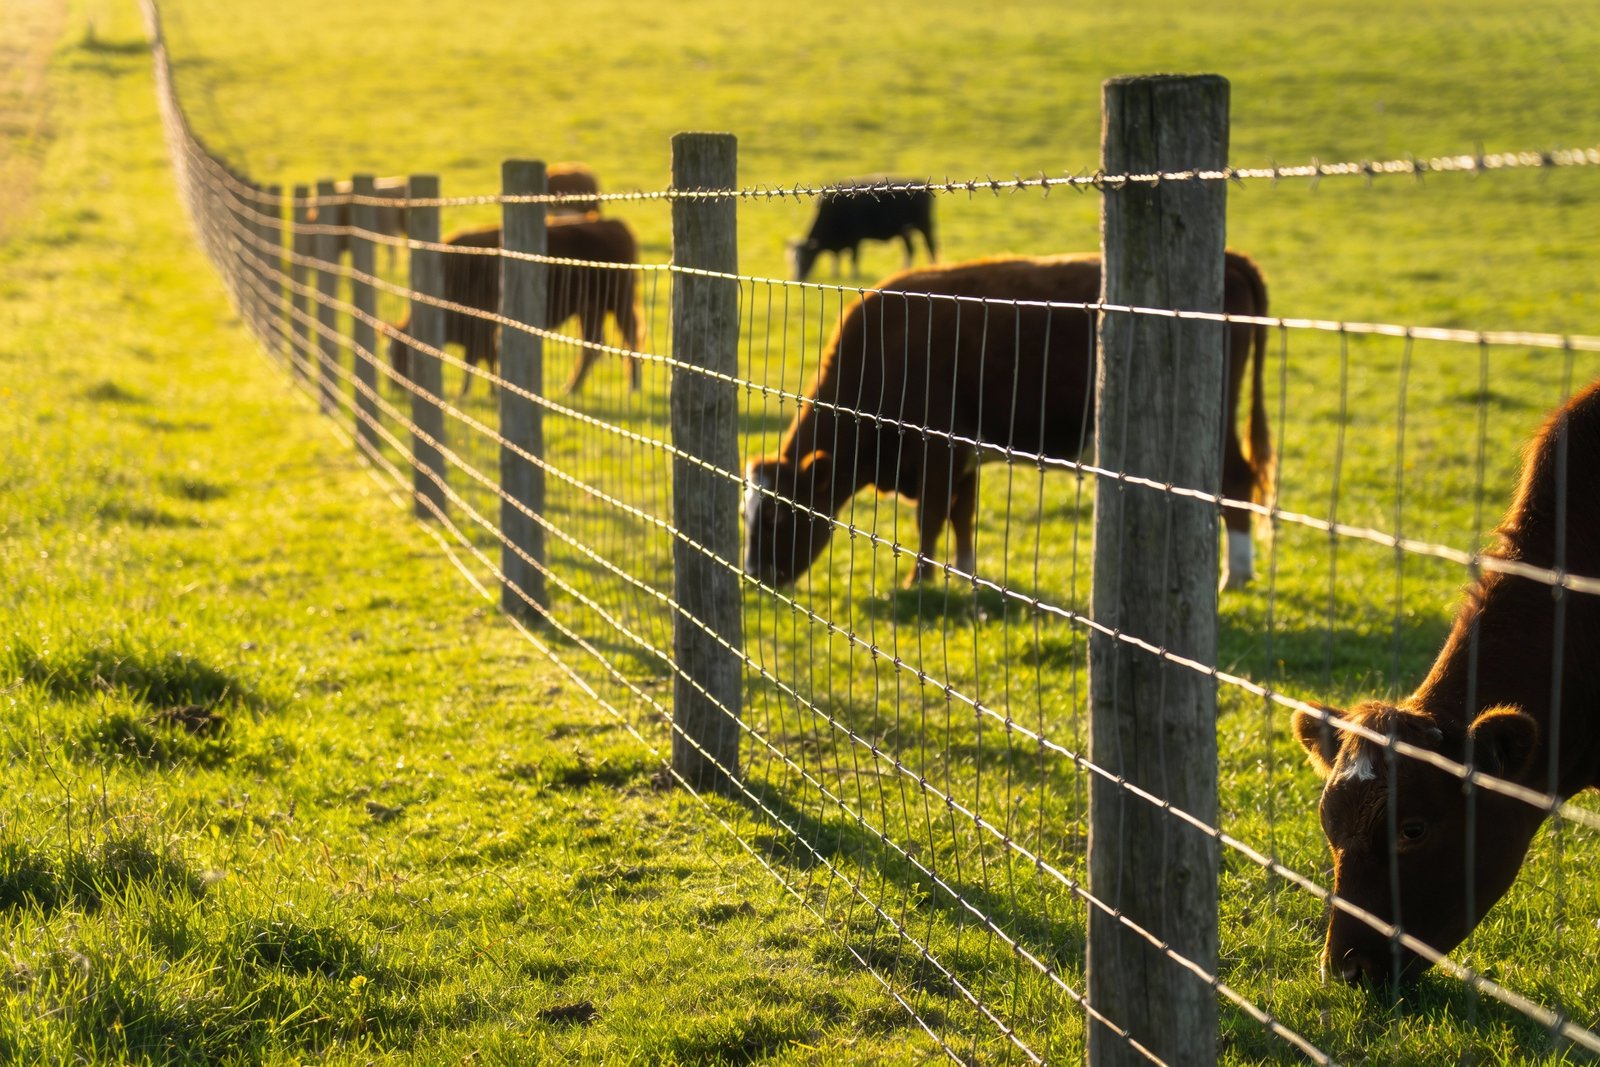
Why Preventive Cattle Fence Maintenance Matters
Proper fence maintenance is one of the highest-ROI investments in livestock management. A well-maintained fence prevents costly emergency repairs, extends infrastructure life by 50–100%, and ensures consistent livestock containment and safety. This section breaks down the economics of prevention vs. reaction.
Preventive Maintenance vs Reactive Repairs
Reactive repairs happen AFTER failure—broken wires requiring immediate replacement, heaved posts needing emergency reinforcement, or loose connections causing livestock loss. These emergencies demand premium labor, create operational disruption, and often require multiple corrective rounds.
Preventive maintenance catches issues during quarterly inspections before they escalate. A loose wire is tightened before it breaks. A leaning post is reinforced before it fails entirely.
Annual Cost Comparison per Mile
Source: 2024–2025 cattle fence market data, USDA NRCS specifications.
How Proper Maintenance Extends Fence Lifespan
- Corrosion Prevention: Class 3 galvanized wire (high-tensile woven fence) is designed for 30–50 year lifespans. Regular inspection and protective treatment prevents rust spots from becoming structural failures.
- Wire Tension Stability: Seasonal adjustments maintain optimal tension (12–16 lbs per line wire depending on gauge), reducing fatigue stress and preventing premature wire failure.
- Post Foundation Integrity: Proactive post reinforcement and drainage management prevent heave and settlement, maintaining structural alignment throughout the fence’s lifespan.
- Connection Durability: Quarterly hardware tightening prevents cumulative loosening from thermal expansion and vibration, maintaining connection strength over decades.
ROI of Preventive Fence Maintenance (4–6x Savings)
| One Mile of Cattle Fence: | |
| Initial installation cost | $20,000–25,000 |
| Preventive maintenance/year (25 years) | $400–600 × 25 = $10,000–15,000 |
| Total cost of ownership (preventive) | $30,000–40,000 |
| vs. Reactive Approach: | |
| Emergency repairs/year (estimated) | $1,800–3,200 × 25 = $45,000–80,000 |
| Additional replacement sections | $5,000–15,000 |
| Total cost of ownership (reactive) | $50,000–95,000 |
| NET SAVINGS (Preventive): $20,000–55,000 per mile | |
| ROI MULTIPLIER: 2.5–4.7x return on preventive maintenance investment | |
Understanding Fence System Stress Factors
Fence failures are never random. Understanding the primary stress vectors allows you to anticipate problems and target inspections where issues are most likely to occur.

Environmental Stress: Weather, Soil Movement, Freeze–Thaw Cycles
- Freeze–Thaw Cycles (Winter): Water in soil expands when frozen, pushing posts upward (heave) by 1–3 inches. Spring thaw creates settlement. Repeated cycles loosen post footings and create gap issues.
- Heavy Snow/Ice Load: Snow accumulation applies downward pressure on wire and top rails. Ice bridging between wires increases lateral stress, causing sagging and wire fatigue.
- Thermal Expansion (Summer): High-tensile wire expands 0.5–1% in length during heat waves. Inadequate tension adjustment allows sagging; over-tension in heat + cold contraction causes wire breakage.
- UV Degradation: Galvanized coatings gradually thin under intense UV exposure. Woven fences in full sun lose protective coating 10–20% faster than shaded sections.
- Wind Load Stress: Wind pressures concentrate stress at post intervals and corner braces. Wind gusts up to 50+ mph create lateral forces that test post bracing and wire connections.
Livestock Pressure Points and Behavioral Wear
- Rubbing & Scratching: Cattle consistently rub against fence in certain locations, wearing wire connections and creating localized stress points.
- Testing Weak Points: Livestock instinctively test fence integrity, concentrating force at sagging sections and loose connections.
- Gate Traffic: Gates experience 2–5x the wear of standard fence due to repeated opening/closing cycles, animal crowding, and hardware stress.
- Water Trough Pressure: Water troughs attached to fence create concentrated downward loads, stressing the post foundation and wire connections.
In high-pressure areas such as gates and rubbing locations, review livestock-specific fence pressure considerations to align your inspection focus with animal behavior patterns.
Structural Stress: Tension Imbalance and Post Settlement
- Tension Loss Over Time: Wire tension naturally decreases 2–5% annually due to stress relaxation in the wire material, requiring seasonal adjustment.
- Post Settlement: Soil compaction and frost heave combine to cause posts to settle unevenly, creating misalignment and localized sagging.
- Corner Post Pullout: Corner braces experience combined tension from two fence lines. Inadequate bracing or shallow post depth allows the corner post to gradually pull out of the ground.
- Wire Crimping Stress: Fixed-knot construction concentrates stress at crimped connection points. Improper crimping or low-quality knots fail prematurely.
Seasonal Cattle Fence Maintenance Checklist
Seasonal maintenance follows the natural cycles of stress on fence systems. This modular framework allows you to schedule maintenance proactively and allocate labor efficiently. Review cattle fence wire specifications to understand tension requirements for your specific wire gauge.
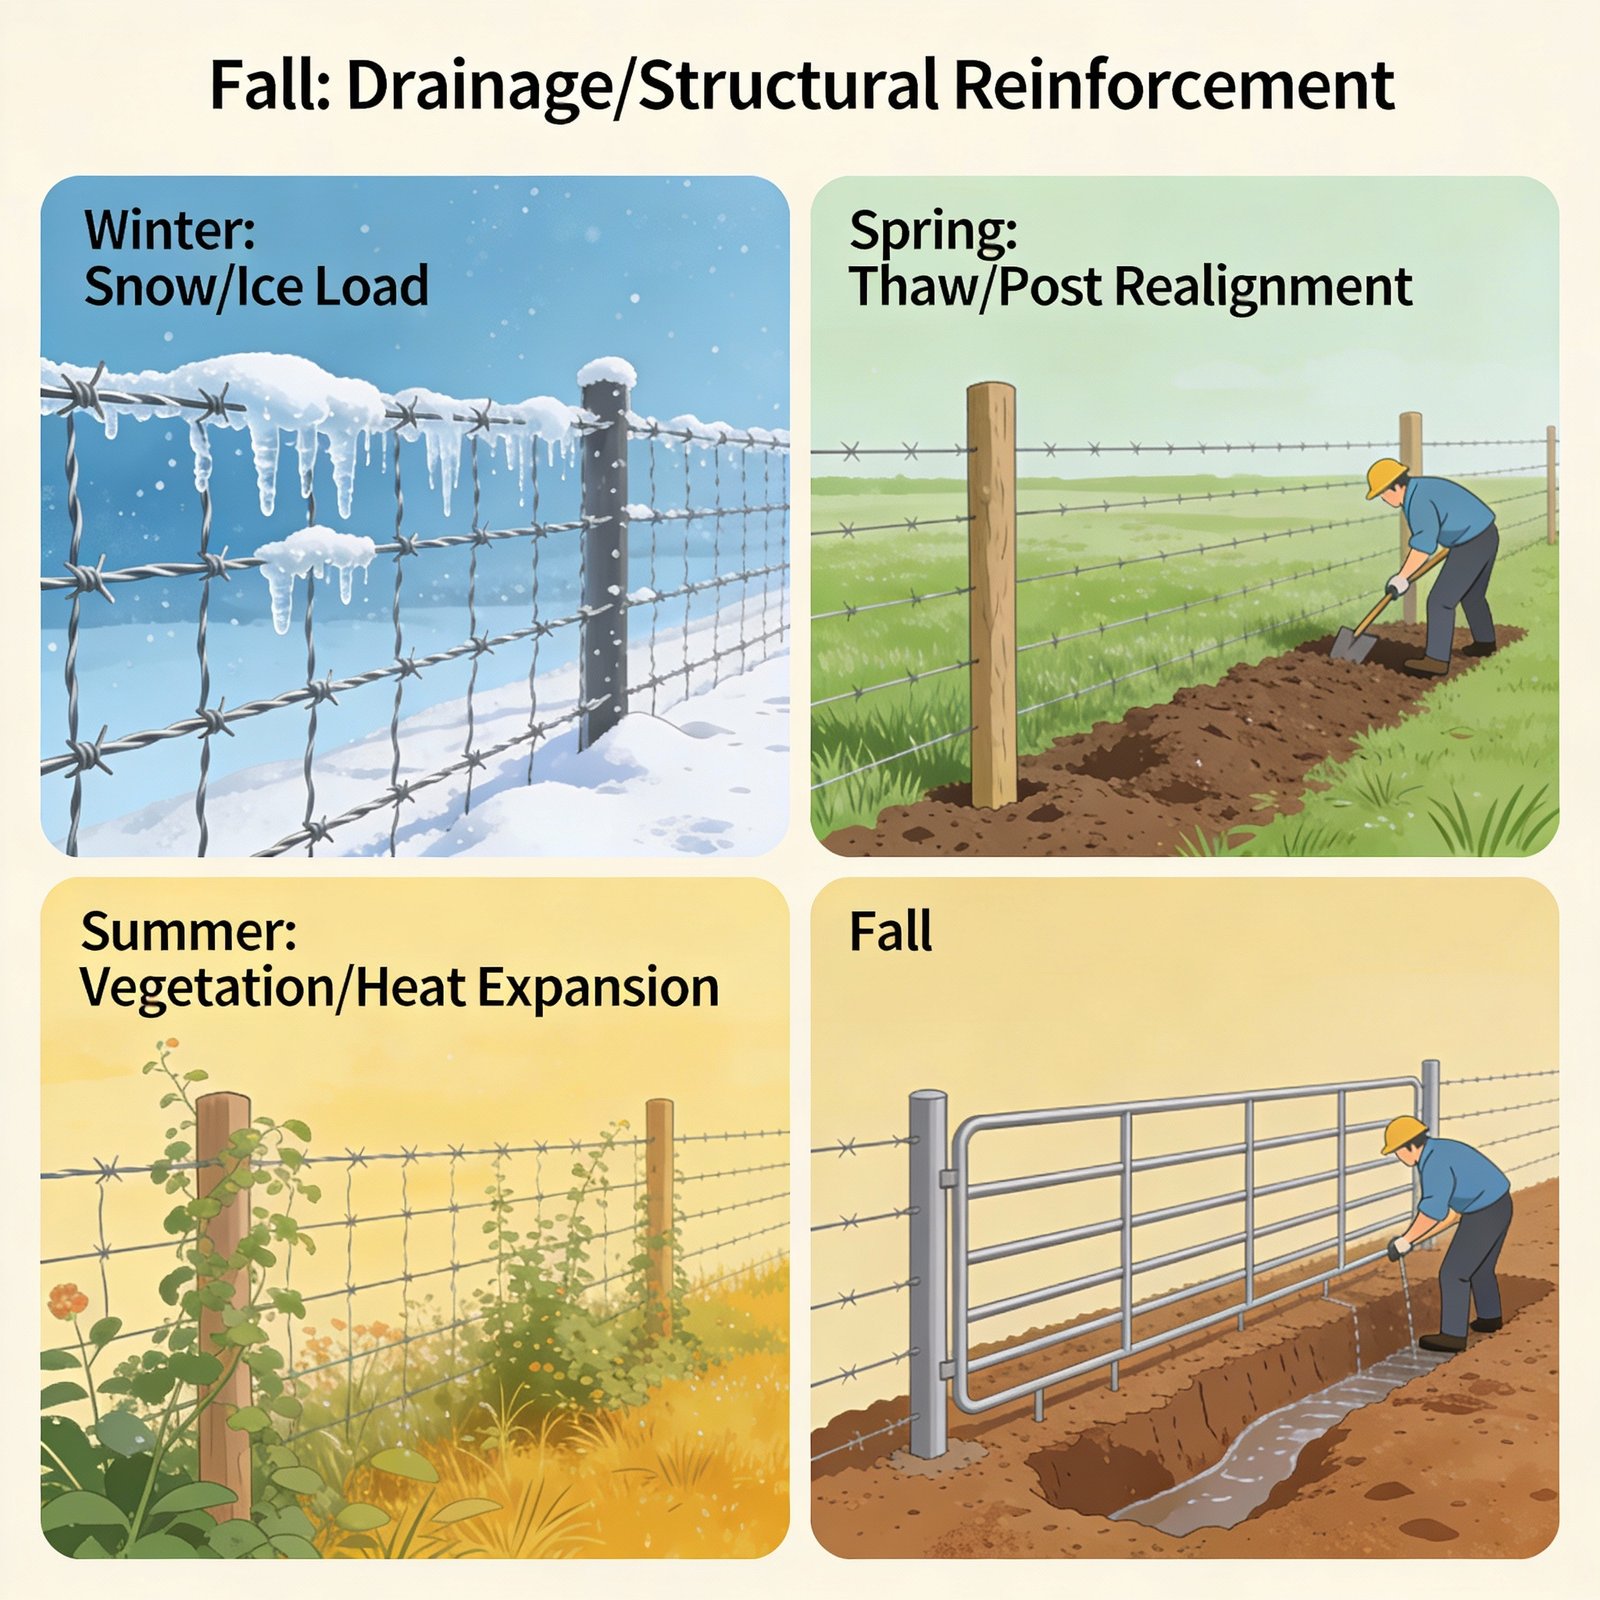
Winter Fence Maintenance (January–February)
WINTER Winter is peak stress season: freeze–thaw cycles heave posts, snow/ice loads stress wire, and reduced visibility makes damage harder to spot.
Spring Fence Inspection & Tension Recovery (March–May)
SPRING Spring is recovery season. Winter damage is visible, frost has lifted, and soil is workable for post reinforcement. This is your primary maintenance window.
Summer Fence Maintenance: Vegetation & Heat Management (June–August)
SUMMER Summer focuses on heat management and vegetation control. High temperatures cause thermal expansion; overgrowth traps moisture and accelerates corrosion.
Fall Fence Preparation for Winter (September–November)
FALL Fall is preparation season. Reduce tension slightly before freeze-up, reinforce weak points, and optimize drainage before winter rains.
Standard Quarterly Fence Inspection System
Beyond seasonal maintenance, quarterly inspections provide early warning of emerging issues. This systematic approach creates professional-grade documentation and ensures nothing is overlooked.
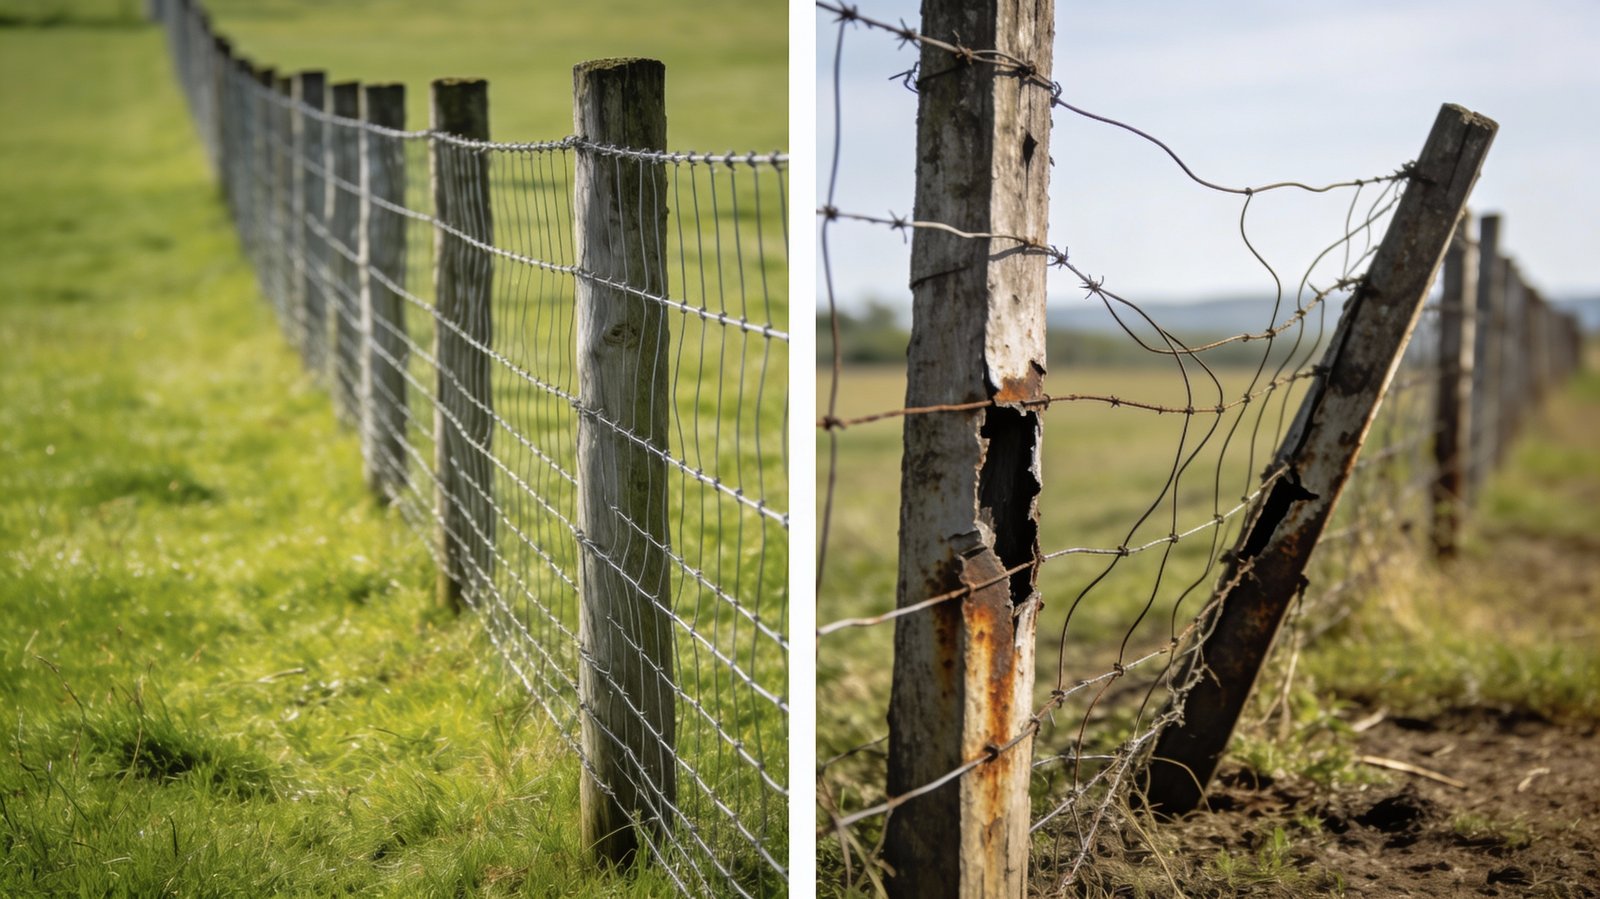
Fence Post Inspection Standards
| Inspection Point | Standard | Action if Failed |
|---|---|---|
| Vertical Alignment | Posts must be within 2° of vertical (use level) | Straighten immediately if leaning >2° |
| Structural Integrity | No visible cracks, splits, or rotting (probe wooden posts with screwdriver) | Replace if damage extends >1 inch into post |
| Foundation Stability | Post movement <0.5″ when pushed hard (test with shoulder pressure) | Reinforce foundation or replace if movement >0.5″ |
| Ground-Level Condition | No rust, corrosion, or rot at ground intersection (most critical failure zone) | Apply protective coating or plan replacement |
| Above-Ground Condition | No rust streaking on galvanized posts; no visible surface corrosion | Minor rust: wire brush + protective coating. Severe: plan replacement. |
| Post Spacing | Fixed-knot fences: 15–20 ft. Traditional field fence: 8–12 ft. (verify against design) | Add intermediate post if spacing exceeds design specification |
Wire, Knot, and Connection Integrity Checks
| Inspection Point | Standard | Action if Failed |
|---|---|---|
| Wire Tension (General) | Tap wire with hammer; hear a clear “ping” sound. Sagging sections >2 inches = tension loss | Tighten gradually (2–3 lb increase per week, max) |
| Broken Wires | ZERO broken wires acceptable (any break = containment failure risk) | Replace broken wire immediately using appropriate splice method |
| Fixed-Knot Integrity | Knots must have 4+ complete wraps; insulator within 8″ of strainer post | Re-crimp or replace defective knots |
| Mid-Line Splices (Figure-Eight) | Tight wraps with no separation; knot securely locked | Re-tie or replace splice if loose or damaged |
| Rust & Corrosion | No visible rust on wire surface. Light surface oxidation acceptable on older fences. | Grade 1–2 corrosion: brush + coating. Grade 3+: plan replacement. |
| Connection Hardware | Bolts, clips, and fasteners hand-tight. No visible looseness or movement. | Tighten all hardware. Replace corroded fasteners. |
Documentation & Record-Keeping Requirements
- Inspection Date & Conditions: Record date, weather, temperature. Environmental conditions affect assessment accuracy.
- Fence Section Notation: Divide property into labeled sections (e.g., “North Pasture – Posts 1–47”). Document findings by section.
- Issue Severity Coding: Use 5-point scale: 1=Monitor, 2=Schedule repair, 3=Urgent repair, 4=Emergency repair, 5=Major failure imminent.
- Photographic Evidence: Take photos of any Grade 2+ issues. Creates visual record for liability and contractor communication.
- Maintenance Action Log: Record every repair completed, materials used, labor hours, and cost. Enables ROI tracking and identifies recurring problems.
- Maintenance Cost Spreadsheet: Maintain yearly cost totals by category (posts, wire, hardware, labor). Compare actual vs. budget and identify cost drivers.
Common Cattle Fence Problems & Repair Solutions
Most fence problems follow predictable patterns. Understanding root causes prevents recurrence after repair. For complex repairs, consult common cattle fence failure mechanisms to align your corrective work with underlying stress factors rather than just surface symptoms.
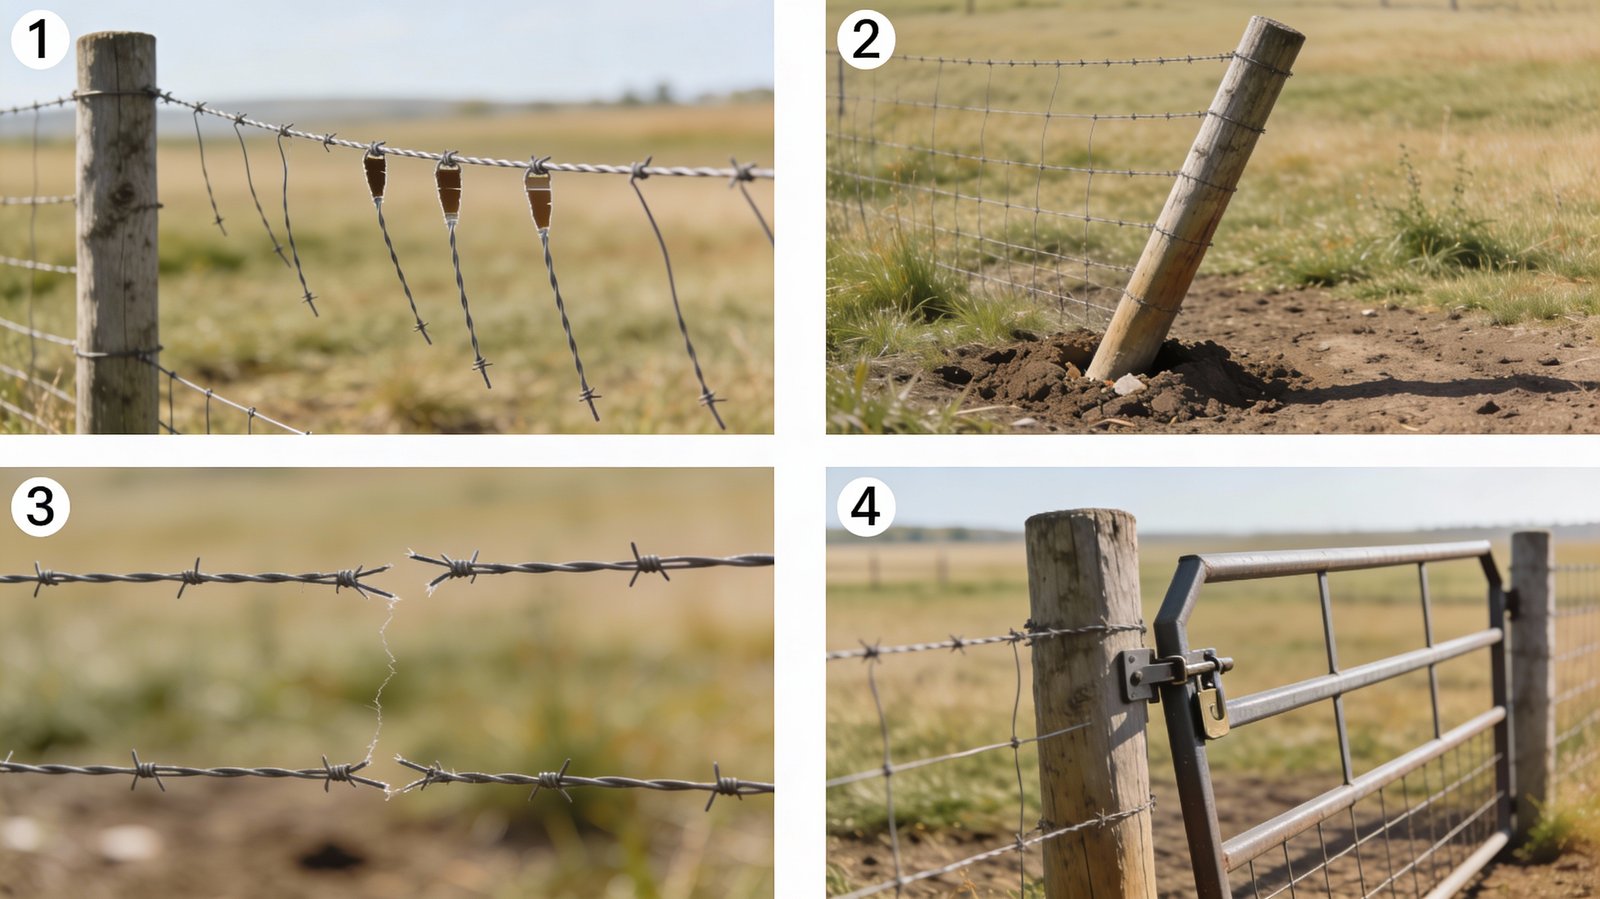
Loose or Sagging Fence Wires
- Visible sag >2 inches between posts
- Dull “thud” when tapping (not the clear “ping” of tight wire)
- Livestock testing fence at sagging sections
- Normal stress relaxation (wire loses 2–5% tension annually)
- Temperature fluctuations (especially winter contraction)
- Improper initial tension setting
- Thermal expansion in summer without tension adjustment
- Measure actual tension using a tension meter (target: 12–16 lbs per line wire for 12.5ga high-tensile).
- Identify tightest section (usually at gate or corner post).
- Use come-along or ratchet tightener to gradually increase tension.
- Critical: Increase tension 2–3 lbs per week maximum. Over-tightening causes wire breakage.
- Verify sag is eliminated and tension meter confirms target range.
- Document new tension setting for future reference.
- Quarterly tension monitoring and adjustment
- Seasonal adjustment (reduce 2–3% before winter, increase after spring thaw)
- Ensure corner posts and braces are structurally sound (loose posts cause tension loss)
Leaning or Heaved Fence Posts
- Posts visibly tilted (use level to measure angle)
- Heave: posts lifted 1–3 inches above original position (freeze–thaw damage)
- Settlement: posts sunken below original position
- Loose foundation (post rocks when pushed)
- Freeze–Thaw (Primary Winter Cause): Water in soil expands, lifting post. Spring thaw creates settlement. Repeated cycles loosen foundation.
- Poor Drainage: Water collects around post base, accelerating frost heave and soil destabilization.
- Shallow Installation: Posts installed <18 inches deep are vulnerable to heave.
- Livestock Pressure: Repeated push-force at certain points gradually loosens post foundation.
- Spring Assessment (Post-Thaw): Wait until ground has fully thawed before major repair. Heaved posts will naturally settle partially.
- Post Straightening (Minor Lean <2°): Use come-along attached to post and secure anchor point. Carefully pull post back to vertical over several adjustments.
- Foundation Reinforcement: If post rocks >0.5″, excavate base and add tamped soil or concrete augmentation.
- Drainage Improvement: Grade soil away from post base. Install french drain if water pooling is visible.
- Post Replacement (Major Lean >3° or Structural Damage): Remove and replace post entirely. Set new post to minimum 18-inch depth (deeper in frost-prone areas).
- Install posts to 18–24 inches minimum depth (deeper in high-frost areas)
- Optimize drainage around all posts
- Use post braces at corners and end posts to resist lateral force
- Inspect posts immediately after freeze–thaw cycles for heave
Broken Wires and Failed Connections
- Visible break or separation in wire
- Knot separation (gap between knot and insulator)
- Loose splice or crimped connection
- Livestock exploit break for escape attempts
- Over-tension: Wire tensioned beyond material limit (especially in cold weather)
- Fatigue Failure: Repeated flex cycles (wind, livestock pressure) concentrate stress at connections
- Corrosion Weakening: Rust reduces wire cross-section and strength
- Improper Crimping/Knot: Defective connection fails prematurely under normal stress
- Reduce tension on broken wire section using come-along.
- Remove damaged section (cut 6–12 inches on each side of break).
- Splice using figure-eight knot (preferred) or reef knot with 4+ complete wraps.
- Gradually restore tension to target range.
- Reduce tension on failed line.
- Remove insulator and re-crimp knot or re-tie with new knot (4+ wraps).
- Verify insulator is within 8 inches of strainer post.
- Restore tension gradually.
- Maintain tension within design specification (12–16 lbs for high-tensile)
- Reduce tension in severe cold (<–5°F) or intense heat (>95°F)
- Inspect splices and connections quarterly
- Address corrosion immediately with protective coating
Gate Misalignment and Hardware Wear
- Gate sags or won’t swing smoothly
- Gate latch doesn’t engage properly (animals can push through)
- Visible rust or corrosion on hinges and brackets
- Gate creaks or binds when opening
- Hardware bolts are loose or corroded
- Post Settlement: Gate posts settle unevenly, causing frame misalignment.
- Hardware Corrosion: Salt air, moisture, and lack of maintenance accelerate rust.
- Repeated Stress Cycles: Opening/closing gates millions of times loosens bolts and hinges.
- Heavy-Load Abuse: Livestock pushing on gate or equipment impact accelerates wear.
- Gate Frame Assessment: Use level to check if gate frame is square (both diagonals equal length).
- Hardware Tightening: Tighten all bolts, hinges, and latches using appropriate wrenches. Hand-tight plus slight additional force.
- Hinge Lubrication: Apply grease or oil to all hinge points monthly to prevent binding.
- Gate Post Straightening: If gate posts have heaved or settled, use come-along to straighten and re-align frame before tightening hardware.
- Latch Mechanism Adjustment: File latch and strike plate to ensure engagement. Replace if worn beyond adjustment.
- Hardware Replacement: Replace any corroded bolts, hinges, or brackets with stainless steel alternatives (superior corrosion resistance).
- Monthly gate operation test (swing fully and check latch)
- Quarterly hardware tightening
- Annual protective coating on metal hardware
- Prevent livestock from leaning on gates (pressure-side panels accelerate wear)
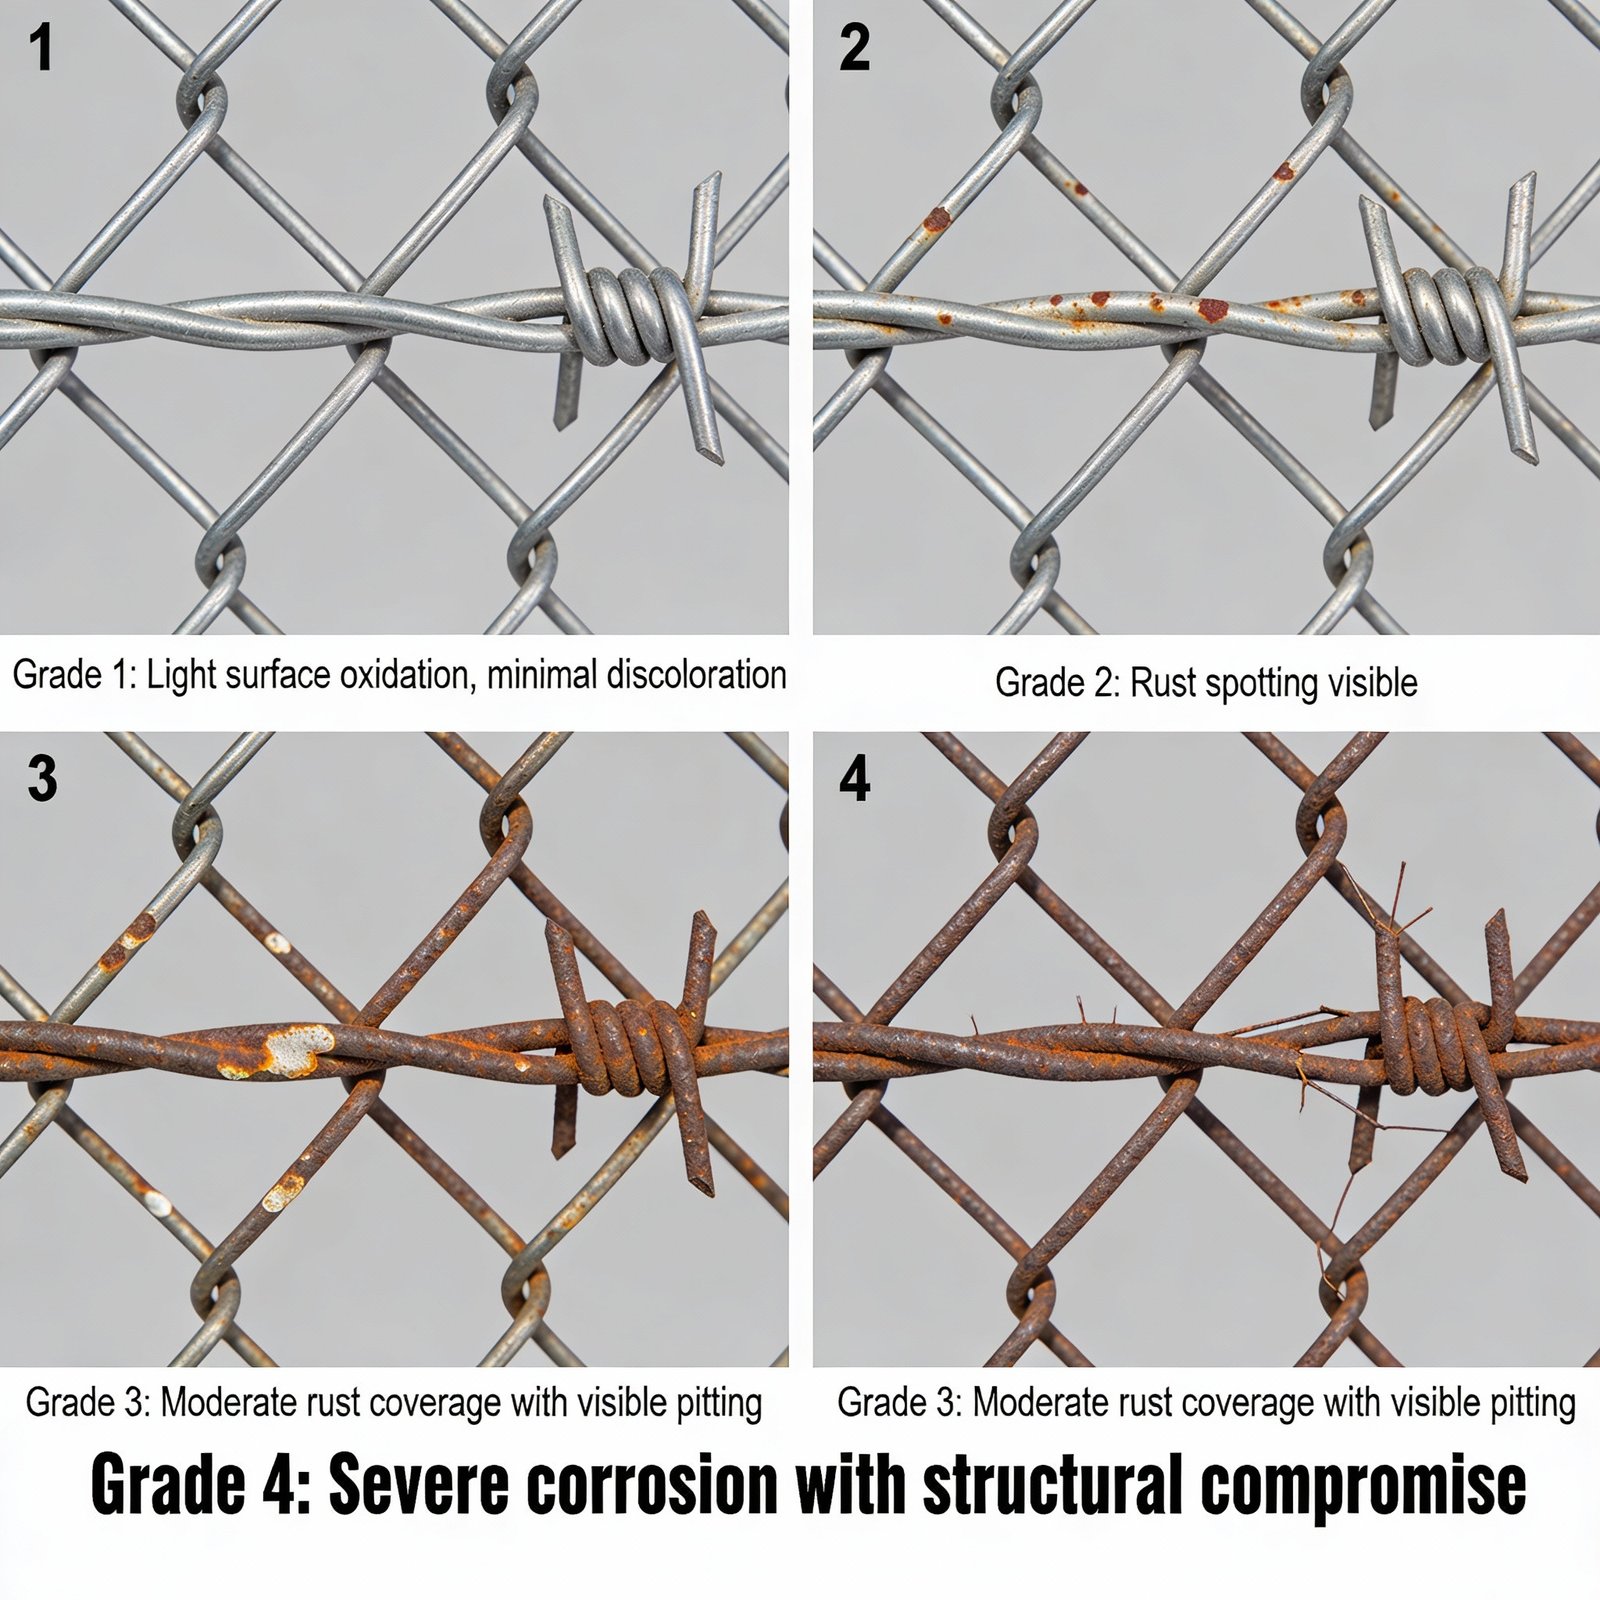
Fence Corrosion Assessment & Treatment Matrix
Corrosion is the primary threat to fence lifespan. Early intervention can extend infrastructure life by 20+ years; delayed action leads to structural failure and costly replacement. When evaluating rust-prone areas in wet or saline soils, it is useful to align your inspection approach with environment-specific fence requirements so that long-term maintenance matches local climate and soil conditions.
Corrosion Severity Levels (Grade 1–4)
| Grade | Visual Description | Severity | Structural Impact | Recommended Action |
|---|---|---|---|---|
| Grade 1 | Light surface oxidation; slight color change on galvanized coating | Minimal | No structural impact; cosmetic only | Monitor quarterly. Protective coating optional. |
| Grade 2 | Rust spotting (1–5 spots per 10 ft); minor surface pitting visible | Low | <1% cross-section loss; strength unaffected | Wire brush rust spots. Apply 2–3 coats protective coating (lacquer or paint). Schedule follow-up in 6 months. |
| Grade 3 | Moderate rust coverage (>10% of wire surface); visible pitting creating surface irregularity | Moderate | 2–10% cross-section loss; tension capacity reduced 5–15% | Aggressive cleaning (wire brush or chemical rust remover). Heavy-duty protective coating. Monthly monitoring. Plan replacement within 12–24 months. |
| Grade 4 | Severe rust; >50% of wire surface corroded; visible thinning or pitting creating holes | Severe | >10% cross-section loss; structural integrity compromised; failure risk imminent | URGENT REPLACEMENT: Wire is approaching end of service life. Replace within 1–3 months. Do NOT delay. |
Repair vs Replacement Decision Guidelines
- Grade 1–2 Corrosion + Fence <15 Years Old: REPAIR. Wire brush, protective coating, extend lifespan 10–15 years.
- Grade 3 Corrosion + Fence <20 Years Old: REPAIR with intensified maintenance (quarterly monitoring). Plan replacement within 24 months.
- Grade 3–4 Corrosion + Fence >20 Years Old: REPLACE. Cost-benefit analysis favors new fence (lifespan 30–50 years) over extended repair.
- Grade 4 Corrosion (Any Age): REPLACE IMMEDIATELY. Structural failure risk is imminent.
- Localized Grade 4 Section Only (<5% of fence): Selective wire replacement of affected section acceptable. Full replacement recommended if >10% affected.
- Protective Coating (Grade 2): $200–400 labor/materials → extends lifespan 10–15 years → highly cost-effective.
- Partial Wire Replacement (Grade 3, <20% of fence): $1,500–3,000 → extends lifespan 5–10 years.
- Aggressive Treatment (Grade 3, >20% of fence): $4,000–7,000 → extends lifespan 3–8 years → COMPARE to full replacement ($20,000–30,000, lifespan 30–50 years).
- Full Replacement (Grade 4): $20,000–30,000 → lifespan 30–50 years → most cost-effective long-term.
Preventive Corrosion Protection Practices
- Class 3 Galvanized Wire Selection (Highest Standard): ASTM A121 Class 3 coating = 3× more galvanizing than Class 1. Cost premium: $1–2/linear foot, but extends lifespan 20+ years.
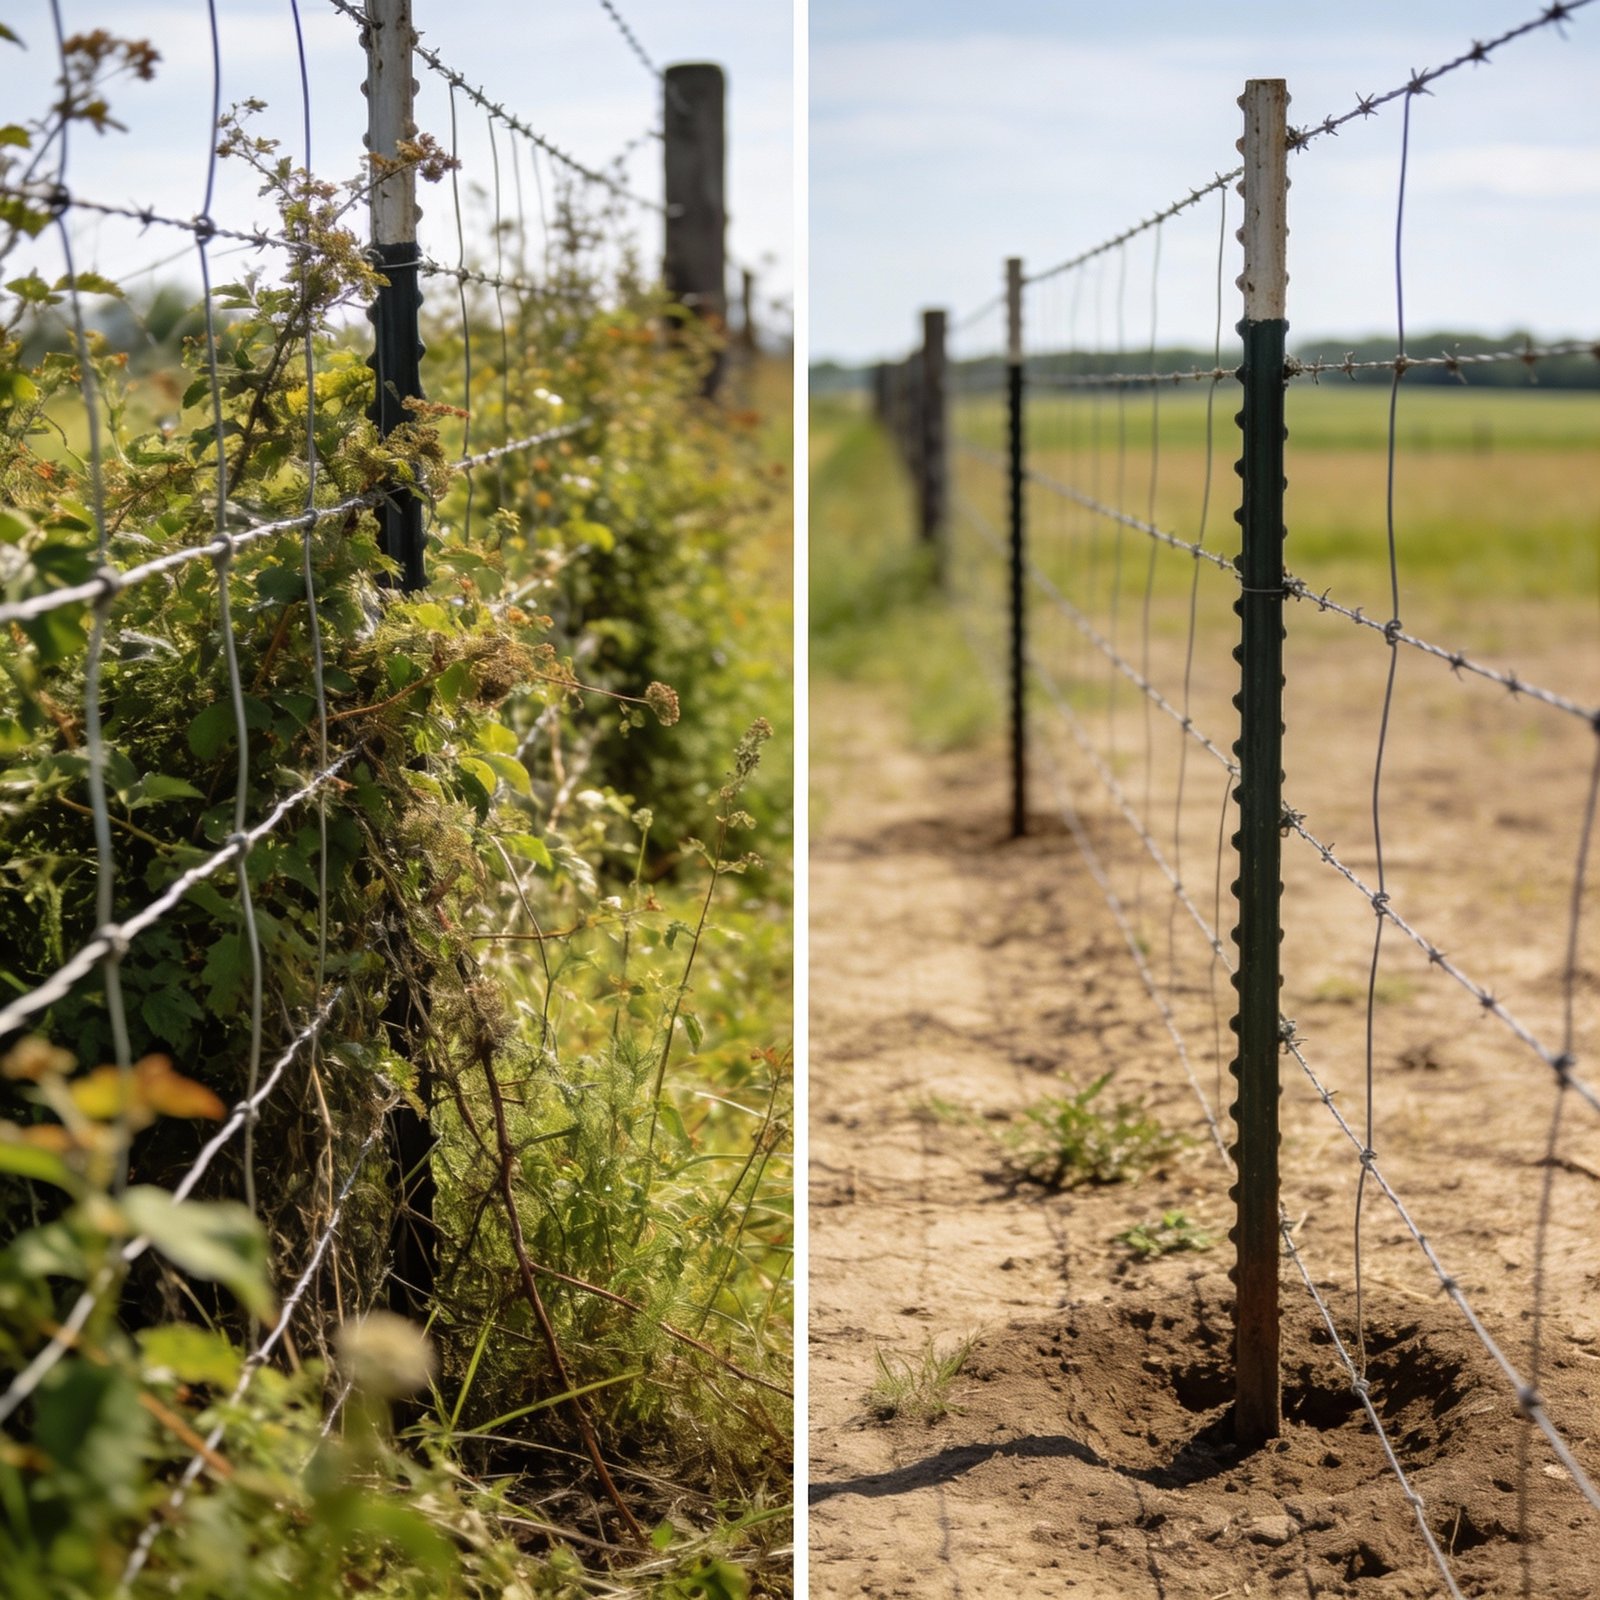
- Vegetation Clearance: Keep 12-inch clear zone around fence base. Vegetation traps moisture and accelerates corrosion.
- Drainage Optimization: Ensure water drains away from fence base. Standing water is prime cause of ground-level corrosion.
- Protective Coating Application: For exposed-risk areas (near salt water, high humidity), apply lacquer, paint, or wax-based protective coating every 5–7 years.
- Post Protection: Wooden posts near water benefit from copper-based or oil-based protective stain applied every 3–5 years.
- Hardware Upgrade to Stainless Steel: Replace steel bolts, brackets, and fasteners with stainless steel (minimal corrosion).
- Annual Inspection & Immediate Treatment: Catch rust spots Grade 1–2 immediately with wire brushing and coating. Grade 3–4 treatment is exponentially more costly.
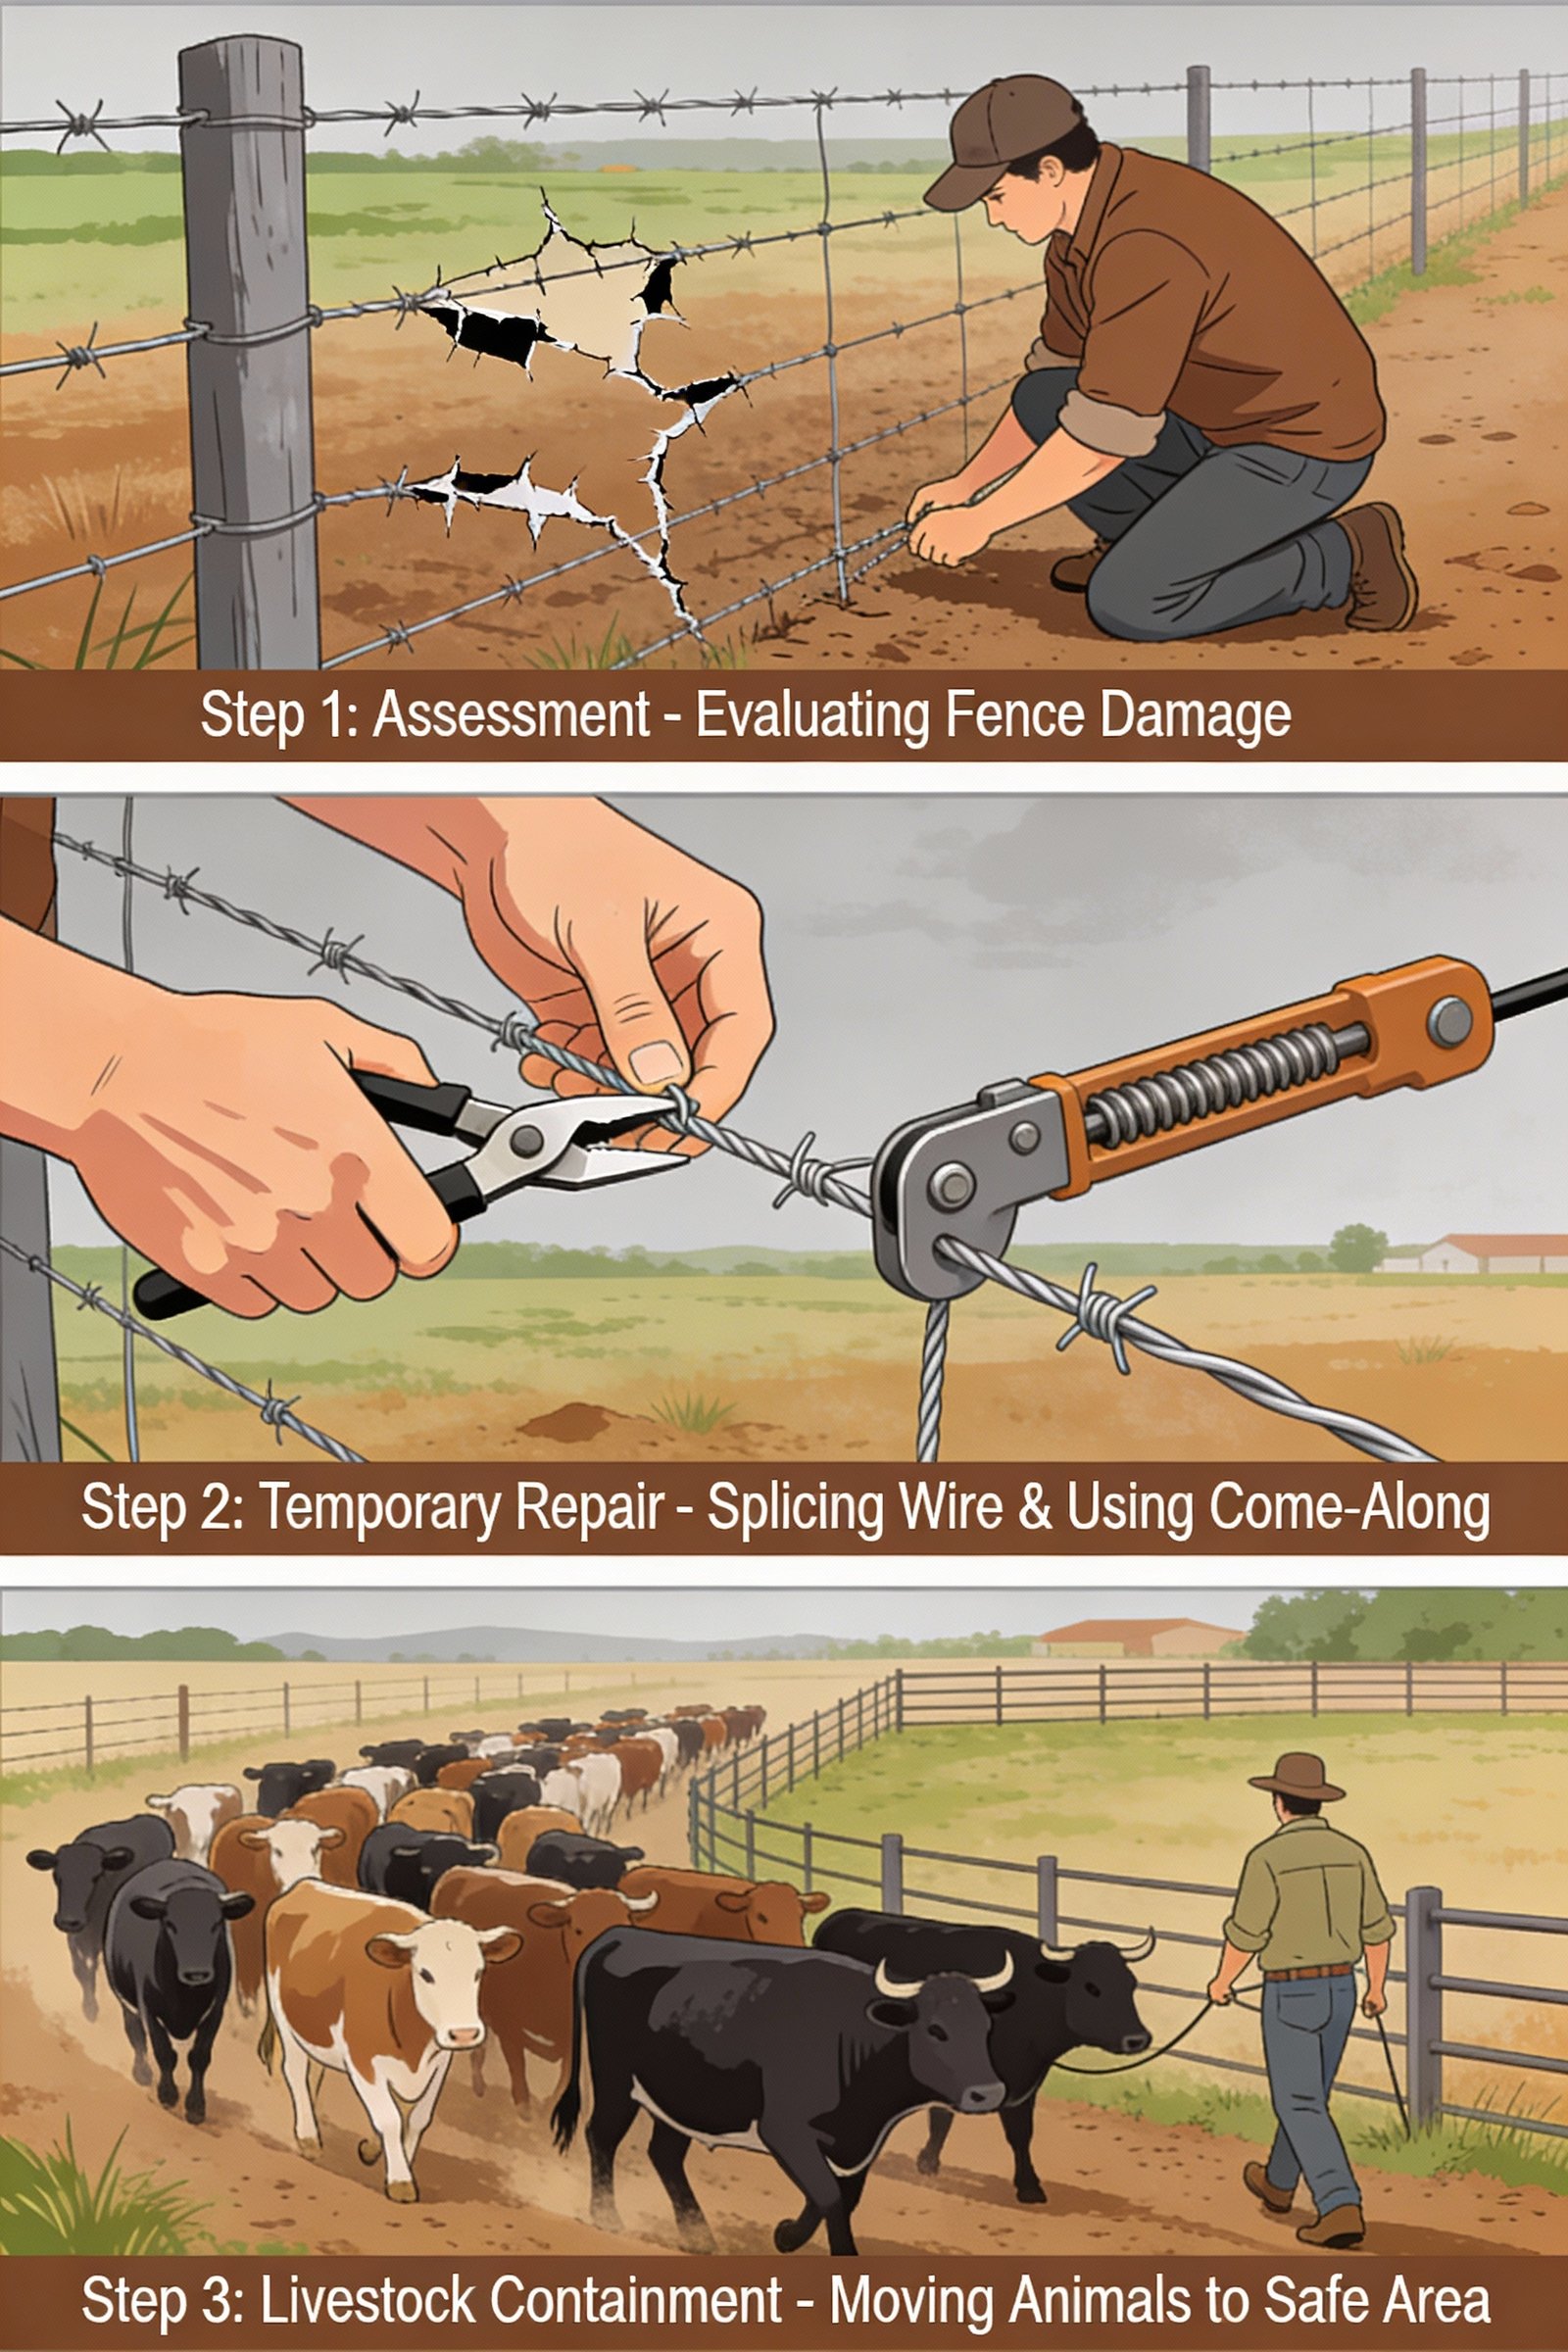
Emergency Cattle Fence Repair Protocols
Fence failures demand rapid response to prevent livestock loss, predator intrusion, and animal injury. Clear protocols ensure you take appropriate action in the critical first 30 minutes.
Immediate Response: First 30 Minutes After Failure
- (0–5 min) ASSESS: Determine if failure is full (no containment) or partial (still contains). Check for livestock in wrong pasture.
- (5–10 min) CONTAIN (if possible): Drive livestock away from breach. Use portable fencing or move animals to alternate pasture immediately if breach is total.
- (10–15 min) SAFETY CHECK: Is the failure creating animal injury hazard? Sharp wire edges or twisted metal require immediate protection (orange tape, warning flags).
- (15–30 min) TEMPORARY REPAIR or CALL CONTRACTOR: See below for decision criteria.
Temporary Fence Repair Methods
- Livestock are contained (safe from wandering)
- Single wire break or loose connection (not multiple failures)
- You have tension measurement equipment and repair supplies on hand
- Multiple wire breaks or structural post failure (requires professional assessment)
- Corner post pullout or major brace failure (safety risk)
- Livestock are NOT contained and professional help is needed to prevent escape
- Failure involves electric fence (electrocution risk)
- Reduce tension on broken wire using come-along (creates slack).
- Cut 6 inches on each side of break.
- Tie figure-eight knot using both wire ends (4+ complete wraps).
- Gradually restore tension to target range.
- Temporary Duration: 24–72 hours safe. Splices will fatigue; replace with new wire section ASAP.
- Identify loose or failed knot at post connection.
- Reduce tension using come-along.
- Re-crimp using crimping tool (4+ wraps minimum).
- Ensure insulator is within 8 inches of post.
- Restore tension gradually.
- Temporary Duration: 48–96 hours. Schedule professional inspection/replacement of compromised section.
- Attach come-along between two posts (bypass the slack section).
- Tighten gradually until sag is reduced to acceptable level (<2 inches).
- DO NOT over-tighten—risk of wire breakage.
- This is a bandage solution valid for 1–2 weeks maximum. Schedule permanent tension restoration or section replacement.
Safety Considerations During Emergency Repairs
- Livestock Safety: Keep animals away from failure zone during repair. Broken wire is an injury hazard.
- Electric Fence Warning: If fence is electrified, VERIFY power is OFF before touching. Use insulated tools. If in doubt, call professional.
- Tension Release Safety: When reducing tension on wires, move slowly and watch for sudden movement as wire relaxes. Do not stand directly in line with wire under tension (whip hazard).
- Contractor Communication: If calling professional, provide exact location coordinates (GPS if available), description of failure type, and livestock containment status.
- Weather Considerations: Avoid major repairs in extreme conditions (severe cold <–5°F, intense heat >95°F, high wind >40 mph). Wait for moderate conditions if livestock are safely contained.
Fence Wire Tension Standards & Seasonal Adjustments
Wire tension is the invisible parameter most critical to fence performance. Improper tension causes sagging (containment failure) or breakage (emergency repair). Consult cattle fence wire specifications for detailed gauge and tension requirements.
Recommended Tension by Wire Gauge (12.5 / 14 / 16)
| Wire Gauge | Tensile Strength (High-Tensile) | Recommended Tension | Target Range | Measurement Method |
|---|---|---|---|---|
| 12.5 ga (0.109″) | 200,000+ psi | 16–18 lbs per wire | 14–20 lbs | Tension meter (electronic preferred) |
| 14 ga (0.080″) | 190,000+ psi | 12–14 lbs per wire | 10–16 lbs | Tension meter (electronic preferred) |
| 16 ga (0.062″) | 180,000+ psi | 8–10 lbs per wire | 6–12 lbs | Tension meter (electronic preferred) |
Seasonal Fence Tension Adjustment Guidelines
- Baseline Assessment: Measure current tension after ground has thawed. Record readings at 3–4 locations per section.
- Typical Situation: Winter contraction has reduced tension 3–8% below target.
- Adjustment Protocol: Gradually increase tension 2–3 lbs per week over 4–6 weeks until target is reached. Monitor for signs of strain or wire breakage.
- Do NOT rush: Over-tightening in spring is a common mistake. Patience prevents wire failure.
- Temperature Monitoring: When ambient temp exceeds 90°F, check tension weekly. High-tensile wire expands 0.5–1% per 60°F increase.
- Typical Situation: Heat expansion increases tension 5–10% above spring baseline.
- Adjustment Protocol: During heat waves (95°F+), reduce tension 2–3% below target to allow for expansion. Return to target when temps moderate.
- Over-tension in heat + cold contraction in fall/winter = breaking point: This is why seasonal adjustment is critical.
- Baseline Assessment: Measure tension after summer heat has moderated (late September). Record readings for winter comparison.
- Typical Situation: Summer heat has expanded wire; as temps drop, tension will decline naturally.
- Adjustment Protocol: Reduce tension 2–3% BEFORE freeze-up begins. This allows for winter contraction without creating dangerous over-tension.
- Why Reduce? Winter contraction will pull wire tighter. If you start at target, winter contraction will over-tension. Pre-emptive reduction prevents this.
- Temperature Threshold: Do NOT tighten wire when ambient temp is below –5°F (wire becomes brittle).
- Monitoring Only: Walk fence line monthly. Note any sagging but do NOT attempt tightening until temps rise above 0°F.
- Emergency Exceptions: If failure occurs in winter, do temporary splicing and wait for spring to do permanent tension restoration.
Tension Monitoring Tools and Inspection Frequency
- Electronic Tension Meter (Preferred): Cost $200–600. Provides digital readout. Most accurate method for consistent measurements. Brands: Dillon, Chatillon (agricultural markets).
- Mechanical Tension Meter: Cost $100–300. Spring-based dial gauge. Adequate accuracy for farm use.
- Tap-and-Listen Method (No Equipment): Strike wire with hammer; clear “ping” indicates good tension. Dull thud = loose wire. NOT precise but useful for quick field assessment.
- Quarterly Standard (Spring, Summer, Fall, Winter): Full tension check at 3–4 representative locations per section. Record all readings.
- Monthly During Transition Seasons (March–April, September–October): Monitor more frequently as temperatures fluctuate. Weekly adjustments may be needed.
- Weekly During Heat Waves (July–August, when temp >90°F): Check tension to prevent over-stress.
- After Severe Weather Events (High Wind, Heavy Snow, Freeze–Thaw): Immediate assessment. Repair any failures and re-establish baseline tension.
- Maintenance Log: Document all tension readings with date, location, temperature, and adjustments made. Use this history to predict seasonal patterns and optimize future adjustments.
Gate Maintenance & Gate Post Standards
Gates are the hardest-working component of any fence system, experiencing 2–5× the wear of standard fence. Systematic maintenance keeps gates functional and prevents escape risks.
Diagnosing and Correcting Sagging Gates
- Gate bottom drags on ground or rubs frame when closing
- Gate sags visibly when opened
- Latch engagement is difficult or inconsistent
- Gate frame is out of square (diagonal measurements not equal)
- Measure Gate Frame Diagonals: Use tape measure to measure corner-to-corner diagonals. If unequal >0.5″, frame is out of square.
- Check Gate Post Alignment: Use level on both gate posts. If either post is leaning >1°, post settlement/heave is the root cause.
- Inspect Hardware Tightness: Check all bolts and hinge connections. Looseness allows frame to flex and sag over time.
- Assess Hinge Condition: Look for bent hinges, rust, or worn pivot points. Worn hinges allow gate to hang unevenly.
- Hardware Tightening (First Step): Tighten ALL bolts, hinges, and latches. Often, sagging is caused by nothing more than loose hardware.
- Gate Post Straightening (if needed): Use come-along to carefully pull leaning post back to vertical. Straighten both hinge post and latch post.
- Frame Re-Squaring (if needed): If frame is out of square, use diagonal braces or come-along to adjust frame until diagonals are equal.
- Hinge Replacement (if worn): If hinges are bent or worn beyond adjustment, replace with heavy-duty stainless steel hinges (superior durability).
- Final Test: Open and close gate smoothly. Verify latch engages without binding.
Gate Hardware Maintenance Schedule
| Maintenance Task | Frequency | Labor Time | Cost |
|---|---|---|---|
| Hinges & Latches Lubrication | Monthly | 5–10 min | $0 (use farm grease) |
| Hardware Bolt Tightening | Quarterly (seasonal) | 15–30 min | $0 (use existing tools) |
| Gate Operation Test (swing fully, latch engagement) | Monthly | 5–10 min | $0 |
| Corrosion Inspection & Touch-Up Coating | Annually (fall) | 30–60 min | $20–50 (paint/coating) |
| Hinge & Hardware Replacement (worn components) | As needed (typically 5–10 years) | 45–90 min | $100–300 per gate |
| Complete Gate Post Reinforcement/Reset | As needed (typically 10–15 years) | 2–4 hours | $300–800 |
Gate Post Installation Depth & Reinforcement
- Minimum Installation Depth: 24–30 inches (deeper than regular fence posts due to concentrated load).
- Recommended Depth in Frost-Prone Areas: 30–36 inches (allows for 6–12 inches of frost depth).
- Post Diameter/Size: 6–8″ wood posts or 4–6″ diameter steel pipe recommended. Larger posts resist heave and settlement better.
- Foundation Material: Tamped soil (6-inch lifts) or concrete backfill (superior stability). Concrete is strongly recommended for gate posts.
- Concrete Depth: If using concrete, extend to within 2–4 inches of grade surface. “Crown” (mound) concrete at surface to shed water.
- Hinge Post Brace: H-brace or diagonal brace extending downslope, resisting pull from gate weight.
- Latch Post Brace: Diagonal brace resisting lateral force from livestock pushing on gate.
- Brace Specification: 2–3″ diameter posts, buried minimum 18 inches, bolted securely to primary posts.
- Brace Angle: 30–45° from vertical (30° = stronger, but requires more space).
Annual Fence Maintenance Budget & Cost Planning (2026)
Proactive budgeting prevents financial surprises and allows for systematic maintenance planning. Use our fence installation cost calculator to estimate your specific project needs. This section provides realistic cost ranges based on 2024–2025 market data.
Average Maintenance Cost per Mile by Fence Type
| Fence Type | Age (Years) | Annual Maintenance (Preventive) | Est. Emergency Repairs | Total Annual Cost |
|---|---|---|---|---|
| High-Tensile Woven (Fixed-Knot) | 0–10 | $300–500 | $0–200 | $300–700 |
| 10–20 | $500–800 | $200–600 | $700–1,400 | |
| 20–30 | $800–1,200 | $600–1,500 | $1,400–2,700 | |
| Traditional Barbed Wire | 0–10 | $400–700 | $200–400 | $600–1,100 |
| 10–20 | $700–1,200 | $400–1,200 | $1,100–2,400 | |
| 20+ (end of life) | $1,200+ | $1,200–3,200 | $2,400–4,400 |
Preventive vs Corrective Maintenance Budget Allocation
Budget Recommendation: Allocate $400–600 per mile annually for preventive maintenance. This prevents 4–7× more expensive emergency repairs.
Cost-Saving Opportunities in Fence Maintenance
- Batch Maintenance: Schedule all seasonal maintenance (inspection, tension checks, repairs) in a single 2–3 day blitz per season. Reduces per-task overhead.
- DIY vs Professional: Routine tasks (inspection, tension tightening, vegetation clearance) are cost-effective DIY. Reserve professional contractors for complex repairs (major post replacement, electrical fence systems).
- Estimated Savings: DIY seasonal maintenance = $100–200 labor cost vs. $800–1,200 if contracted out. Payback period: <2 years of owner education/tool investment.
- Buy Class 3 Galvanized Wire: 10–20% premium cost upfront = 50–100% longer lifespan. Break-even within 5–7 years.
- Stainless Hardware: 30–50% more expensive than steel, but zero corrosion = lifetime durability. Cost-effective for gates (high-traffic, high-corrosion zones).
- Bulk Material Purchasing: Stock common replacement parts (wire, connectors, posts, fasteners) during off-season sales (November–February). Estimated savings: 10–20%.
- Quarterly Inspections: $100–200 labor cost per inspection = prevents $800–2,000 emergency repair. 8–10× ROI.
- Documentation System: Maintain maintenance log (photos, costs, repairs). Identifies recurring problem areas and informs long-term planning.
- Early Intervention: Grade 2 corrosion = $200–400 coating fix. Grade 4 corrosion = $3,000–5,000 wire replacement. The difference: one quarterly inspection catching the issue early.
- Annual Service Contracts: Negotiate flat-fee annual contracts with local fence contractors. Often 15–25% cheaper than per-hour emergency repairs.
- Group Purchasing: Coordinate fence maintenance with neighboring farms. Contractors often reduce per-mile rates for larger projects (2+ miles).
- Off-Season Scheduling: Schedule major repairs (October–November or April) when contractors have availability. Emergency repairs (summer, winter) command premium pricing.
When to DIY and When to Hire a Professional Fence Contractor
Smart fence management combines owner maintenance with professional expertise. This section clarifies the boundary between each. When upgrading your fence system, evaluate how your maintenance experience aligns with installation outcomes rather than focusing solely on product selection.
Repairs Suitable for DIY Maintenance
- Quarterly Inspections & Documentation: Walk fence line, photograph issues, record findings in log. Costs: $0 (your time). Prevents $800–2,000 emergency repairs.
- Vegetation Clearance: Trim weeds, brush, and overhanging branches within 12 inches of fence line. Costs: $50–100 equipment/fuel. Extends fence life 5–10 years.
- Hardware Tightening: Use wrench set to tighten bolts, hinges, latches quarterly. Costs: $0 (existing tools). Prevents gate failure and loose connections.
- Wire Tension Monitoring: Use tension meter to check tension 2–3 times per year. Costs: $1–2 per check (electricity for electronic meter). Prevents sagging and premature failure.
- Single Wire Splicing (Mid-Line): Tie figure-eight knot for broken wire. Costs: $10 materials. Restores containment quickly. (Requires come-along rental: $30–50 if not owned.)
- Temporary Gate Repairs: Tighten hardware, adjust latch engagement, lubricate hinges. Costs: $0–20. Improves functionality significantly.
- Drainage Improvement: Grade soil away from fence base, clear drainage paths. Costs: $0–50 equipment. Prevents heave and post failure.
- Protective Coating Application: Paint or lacquer coating on corroded spots (Grade 1–2). Costs: $50–150 materials. Extends lifespan 10–15 years if caught early.
- Basic carpentry/mechanical aptitude
- Comfort using hand tools (wrench, level, hammer)
- Ability to safely operate come-along or mechanical puller
- Willingness to learn from instructional resources (YouTube, NRCS guides, fence supplier manuals)
- Quarterly inspections: 4–8 hours per year
- Seasonal maintenance tasks: 8–16 hours per year
- Emergency repair (single wire break): 1–3 hours
- Total: 20–30 hours per year for comprehensive DIY maintenance
Situations Requiring Professional Fence Services
- Fence Post Replacement or Major Realignment: Requires excavation, heavy equipment, proper depth/bracing standards. Safety/structural risk is high for DIY.
- Corner Post or Brace Failure: Corner posts handle stress from two fence lines. Improper repair creates cascade failures. Professional assessment is critical.
- Electrical Fence System Installation/Repair: Electrocution risk, grounding system complexity. Licensed electrician or specialized fence contractor recommended.
- Large-Scale Wire Replacement (>100 linear feet): Requires tension management across large span. Professional equipment and expertise prevents errors that affect entire fence section.
- Gate Post Foundation Work (Concrete installation, deep excavation): Improper gate post foundation causes chronic sagging. Professional installation ensures lifespan.
- Corrosion Assessment & Treatment (Grade 3–4): Professional inspection determines if repair is viable or replacement is necessary. Prevents costly mistakes.
- Multiple Simultaneous Failures (Structural emergency): Requires rapid assessment, prioritization, and coordinated repairs. Professional management ensures livestock safety.
- Specialized Fence Types (High-tensile, poly-braid, hybrid systems): Non-standard materials may require specialized knowledge and equipment.
- Any failure requiring equipment rental >$100 (excavator, power auger, heavy come-along)
- Any structural issue where improper repair creates safety liability
- Grade 3–4 corrosion assessment (professional judgment on repair vs. replacement ROI)
- Installation of NEW fence (design, material selection, tension calculation)
- Emergency repairs during night/weekend when you’re unavailable
Benefits of Professional Installation and Repair
- Design Optimization: Professionals account for terrain, soil type, climate stress. Proper design extends lifespan 10+ years vs. poor design.
- Installation Standards Compliance: NRCS, ASTM specifications ensure structural integrity and longevity.
- Warranty & Liability Protection: Professional installation includes guarantees. If failure occurs within warranty period, contractor covers repair.
- Specialized Equipment: Professionals have power augers, tractor-mounted pullers, and tension measurement tools. Owner rental costs can exceed professional labor savings.
- Speed & Efficiency: Professional crew completes in days what takes owner weeks or months. Reduces liability exposure period.
- Problem Prevention: Experienced professionals catch design/installation issues before they become major failures.
- At least 10+ years fence industry experience
- References from local livestock operations
- NRCS or similar standards certification (if available in your region)
- Written estimate with detailed specifications and timeline
- Warranty terms (minimum 1–2 years on workmanship)
- Insurance and bonding verification
If you want to look beyond basic task lists and focus specifically on maintenance outcomes over time, see a deeper comparison of DIY versus professional installation outcomes to align your repair strategy with long-term performance rather than short-term labor savings.
Key Performance Indicators for Fence Maintenance Success
Data-driven fence management allows you to track effectiveness, optimize spending, and make evidence-based decisions. This section defines professional-grade KPIs for fence systems.
Preventive Maintenance Ratio Targets
Emergency Repair Frequency Benchmarks
Documentation and Compliance Metrics
| Metric | Frequency | Target | Use |
|---|---|---|---|
| Inspection Completion Rate | Quarterly | 100% (4 per year) | Tracks adherence to preventive schedule |
| Issues Identified (by grade) | Per inspection | Grade 1–2: >80% Grade 3+: <20% | Indicates effectiveness of early detection system |
| Issue Resolution Time | Per issue logged | Grade 1: <4 weeks Grade 2: <2 weeks Grade 3: <1 week Grade 4: immediate | Tracks response efficiency and risk management |
| Cost per Mile per Year | Annually | $400–600 (preventive) vs. $1,800–3,200 (reactive) | Budget tracking and ROI verification |
| Cost Variance (Actual vs. Budget) | Quarterly | ±10% acceptable | Identifies cost drivers and unexpected expenses |
| Recurring Problem Areas | Annually | Zero same-location failures | Identifies design flaws or maintenance gaps that need permanent solution |
| Equipment Downtime | Per incident | <24 hours (emergency containment only) | Tracks impact on livestock management and operational risk |
Fence Maintenance Standards, References & Safety Disclaimer
Industry Standards (ASTM, ASAE, ISO)
- ASTM A121: Standard Specification for Zinc-Coated (Galvanized) Steel Barbed Wire. Defines galvanizing classes (1–3). Class 3 = 3× zinc vs. Class 1. Recommended for high-durability applications.
- ASTM A700: Standard Practice for Packaging, Marking, and Loading Methods for Steel Products for Shipment. Ensures quality standards across manufacturers.
- ASAE S318.19: Specifications for Fixed and Non-Rigid Fencing. Defines design standards, post spacing, bracing requirements by fence type and livestock class.
- NRCS 382 (US Spec): Fence Specification (Barbed, Smooth, Woven Wire). Comprehensive USDA standard for design, installation, materials, and maintenance. Available at USDA-NRCS.gov.
- ISO 9001: Quality Management System. Certifies manufacturers for consistent production standards.
- Local Building Codes & Zoning: Verify local regulations for fence height, setback from property lines, and required permits. Regulations vary by jurisdiction.
When aligning your maintenance practices with formal requirements, it is important to understand how NRCS and ASTM fencing standards shape recommended post depths, tension limits, and corrosion controls; detailed guidance is available in the cattle fence standards and regulatory requirements reference so that your repair work remains compliant over the fence’s service life.
Safety Warnings and Usage Disclaimer
This guide provides general information on cattle fence maintenance and repair. It is NOT a substitute for professional engineering, installation, or safety assessment. The following risks apply to all fence work:
- Tension Release Hazards: Wire under tension can snap and cause serious injury. Always release tension gradually using mechanical pullers. Never stand in line with tensioned wire.
- Electrocution Risk (Electric Fences): Electric fence systems pose electrocution and burn risk. Do NOT touch energized fence. Use insulated tools. Consult licensed electrician for installation/repair.
- Equipment Operation: Equipment like come-alongs, excavators, and mechanical pullers are dangerous without proper training. Ensure operators are qualified and follow manufacturer safety protocols.
- Livestock Safety: Improper fence repair creates animal injury hazards (sharp wires, gaps for entanglement). Always verify animal safety during and after repair work.
- Structural Failure Risks: Improper design or installation can lead to total fence failure, livestock escape, predator intrusion, and liability for damages.
- Environmental Hazards: Extreme weather (high wind, snow load, freeze–thaw) creates stress beyond normal parameters. Monitor fence during severe weather and address damage immediately.
- Professional Consultation Recommended: For any major repair, structural concern, or uncertainty, consult a professional fence contractor or engineer. The cost of professional assessment is far less than liability for improper work.
User assumes all risk. The author and publisher of this guide assume no liability for injury, property damage, or economic loss resulting from fence maintenance or repair work. Users are responsible for all safety precautions, code compliance, and professional consultation as needed.
Update Cycle and Review Schedule
| Content Review Date: | January 2026 |
| Next Scheduled Update: | January 2027 (Annual review of cost data, standards, and maintenance practices) |
| Update Triggers (Immediate Revisions): | Major change to ASTM/NRCS standards, significant market cost shift (>15%), new product technology, significant seasonal pattern changes |
| Content Maintenance: | Cost data, product specifications, and industry standards are reviewed quarterly. Link citations and external references are validated monthly. |
For long-term planning insight into how different maintenance programs perform in the field, you can also review real-world cattle fence performance case studies that quantify how proactive inspection, corrosion control, and timely repairs affect service life and total maintenance spend per mile.
Finally, if your maintenance records show repeated corrosion-related rework or costly tension and post failures, it may indicate upstream specification issues rather than pure maintenance gaps; reviewing material selection mistakes that increase long-term maintenance costs can help you diagnose whether earlier design or purchasing choices are driving today’s repair workload.