
Cattle Fence Wire Buying Mistakes Every Farmer Should Avoid
Choosing the wrong cattle fence wire is one of the most common reasons for premature fence failure and inflated lifetime cost, especially in high-pressure livestock systems.
This comprehensive guide explains the most frequent mistakes in selecting and specifying cattle fence wire, why they happen from an engineering perspective, and how to avoid them with practical, field-tested strategies derived from university extension research, NRCS standards, and agricultural engineering studies.
If you need a step-by-step decision framework first, see our comprehensive cattle fence wire buying guide for system-level planning before you dive into mistakes and failure mechanisms.
This cluster page is about error avoidance in cattle fence wire decisions: we do not list SKUs, prices, or brands, and we do not replace the main buying guide. Instead, we show how and why fences fail so you can specify and install them correctly based on engineering principles and regional best practices.
1. Ignoring Environmental Conditions
1.1 Mistake Description
Many buyers assume one fence wire specification will work everywhere, regardless of climate, soil chemistry, or corrosion risk.
Decisions are often made on up-front price alone, with little consideration for atmospheric corrosivity, salt exposure, fertilizer use, or humidity that will control how long coatings actually last in the field.
1.2 Why This Fails (Engineering Logic)
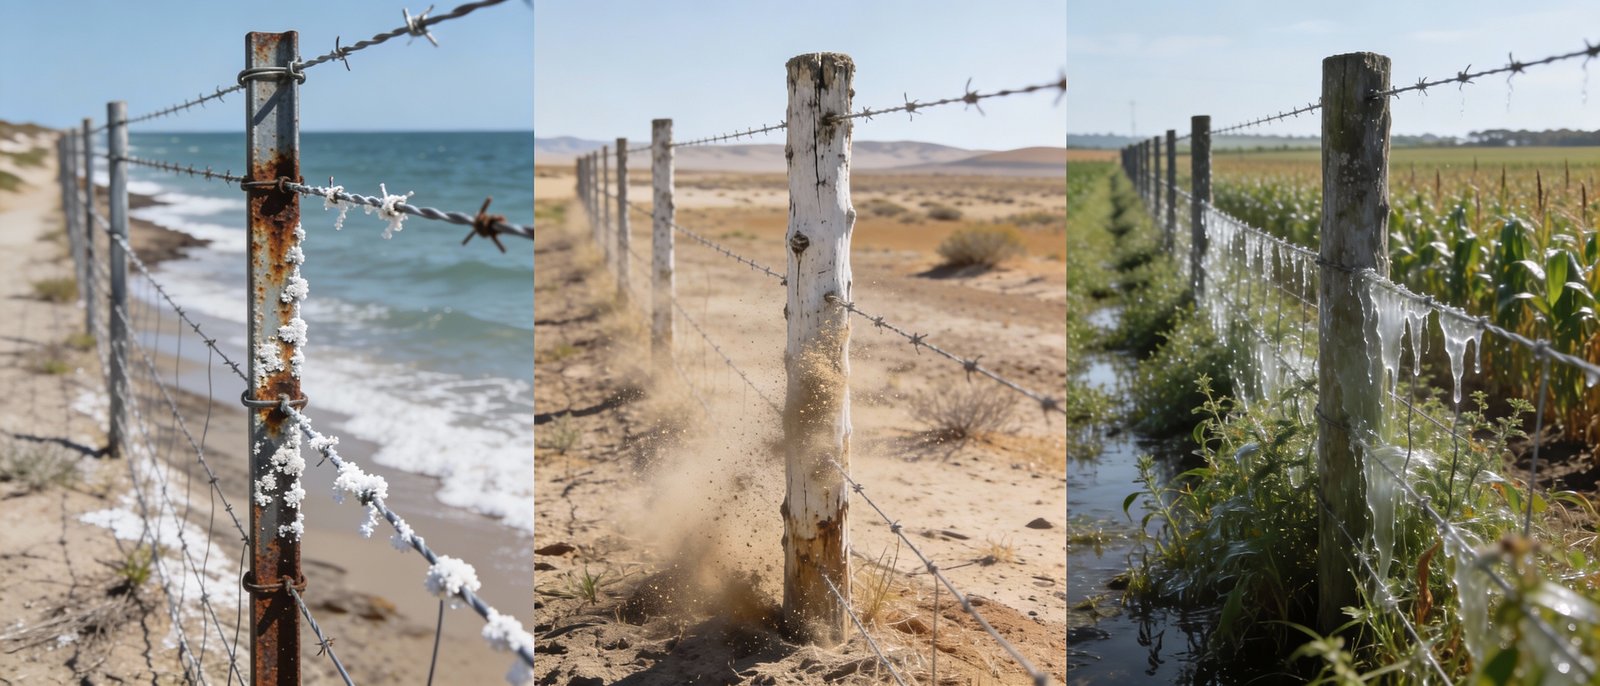
Environmental stress strongly changes corrosion rate, abrasion and thermal stress, so the same coating behaves very differently in coastal, humid, or dry inland locations.
Coastal salt spray introduces chloride ions that break down the passive film on zinc, accelerate localized attack, and drive pitting corrosion beneath the surface, especially at coating defects and cut ends.
In agricultural settings, nitrogen fertilizers like ammonium nitrate and UAN can acidify surface moisture and significantly increase steel corrosion rates, particularly where water and manure pond along the fence line.
Dry, windy environments create a different stress pattern: airborne dust and abrasive particles erode coatings mechanically, while large daily temperature swings induce thermal strains at welded joints and bends.
1.3 Consequences
In high-corrosivity environments, thin galvanizing layers can be consumed much faster than in neutral inland climates, leading to premature rusting well before the nominal design life of the product.
Pitting corrosion (localized attack that propagates beneath the surface) is especially dangerous because steel can lose load-bearing capacity at local hot spots while appearing sound from the outside.
Field experience and engineering studies confirm that many wire breaks initiate at these localized, corroded stress risers—particularly at bends, knots, and attachment holes—rather than in the mid-span wire.
1.4 How to Avoid It (Correct Approach)
Match coating class and system design to the corrosivity of your site instead of defaulting to a single spec everywhere.
For standard inland grazing conditions, agricultural guidance commonly recommends at least Class 3 galvanized coatings (approximately 0.80 oz/ft², often called “Type III” in some NRCS fence specs) on 12.5-gauge high tensile wire to achieve multi-decade service life under normal exposure.
In more aggressive environments—high humidity, regular fertilizer spray, or near-coastal zones—Zn–Al alloy coatings (for example proprietary zinc-aluminum systems often benchmarked as “20-year” or “40-year” classes) have been shown to substantially outperform conventional galvanizing in salt spray and cyclic corrosion testing.
Consult your environment-specific fence selection resources and complete cattle fence wire buying guide alongside relevant regional fencing standards and regulations to confirm minimum coating weights and compatible materials for your climate zone.
When this page refers to “coastal” or “high-corrosivity” conditions, it assumes environments with regular salt spray (typically within 50 km of coastline), high humidity (>80% relative humidity), or aggressive chemical exposure. Local building codes, NRCS standards, and extension publications provide the most authoritative corrosivity classification for your region.
2. Mismatched Coating Selection
2.1 Mistake Description
A common error is specifying low-grade or unspecified galvanized wire for high-moisture, coastal, or chemically aggressive sites, because it is cheaper per foot at the time of purchase.
Another variant is treating “galvanized” as a single category and not requiring a coating class, which allows weaker commercial coatings to be substituted for agricultural-grade Class 3 or better.
2.2 Why It Is Wrong (Failure Mechanism)
Thin zinc coatings can be consumed quickly in chloride-rich or fertilizer-contaminated moisture films, exposing bare steel and shifting corrosion to the higher-rate attack of unprotected carbon steel.
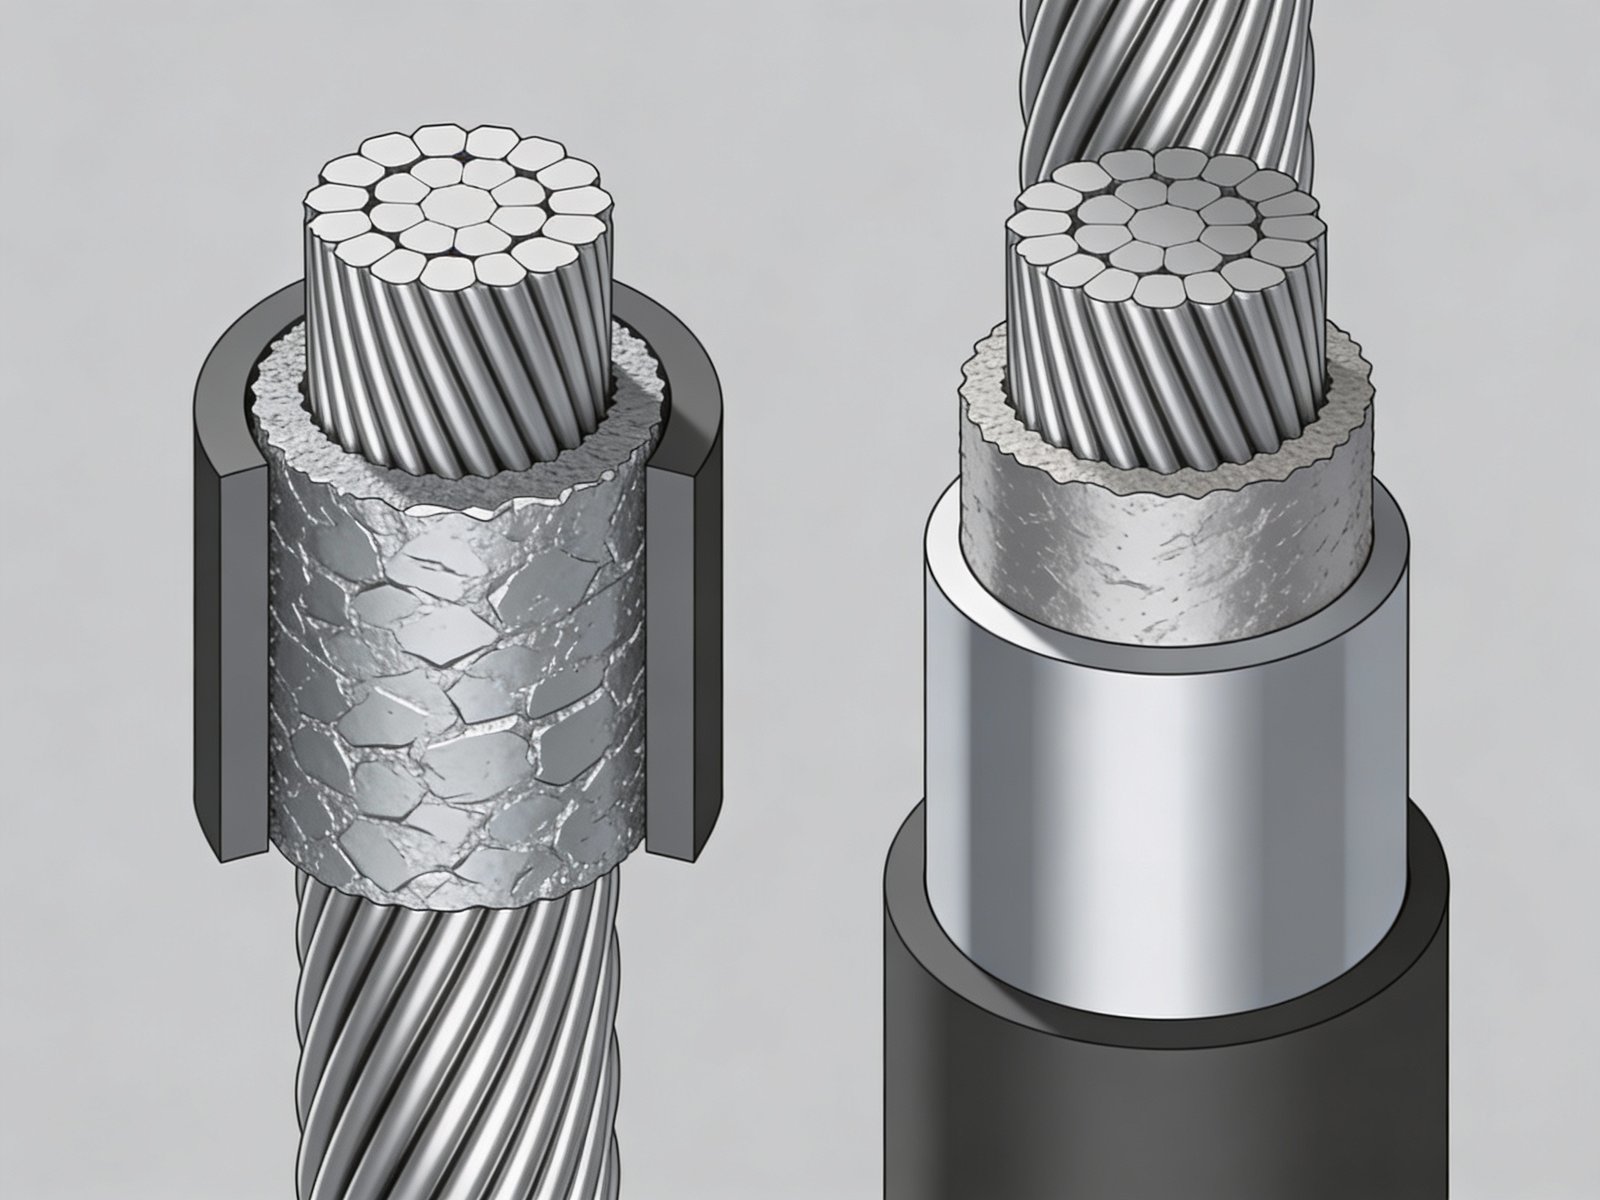
Coating performance depends not only on thickness, but also on alloy composition and microstructure: Zn–Al systems form more stable corrosion products and barrier layers compared with pure zinc in salt fog testing, which slows down further metal loss.
2.3 Common Outcome
In practice, farmers frequently report visible rust spots on light-coated agricultural wire within a few seasons in damp or coastal paddocks, while heavier Class 3 or Zn–Al coated products in similar service remain largely intact over much longer intervals.
Once red rust establishes, localized pitting and section loss tend to concentrate at connections, knots, and bends, where tensile demand is highest, increasing the risk of sudden wire breakage under animal or snow load.
2.4 Correct Specification Logic
Use Class 3 galvanized coatings as a minimum for long-term agricultural fencing, and escalate to Zn–Al (and similar advanced systems) where atmospheric or chemical exposure is severe.
University and NRCS fence specifications for permanent high tensile systems typically call for 12.5-gauge high tensile wire with minimum tensile strength around 170,000 psi and Class 3 galvanizing, reflecting a balance of strength and coating durability.
When comparing advanced coatings, note that proprietary Zn–Al and Zn–Al–Mg systems are often rated at roughly two to three times the life of conventional Class 1 galvanized in standardized corrosion tests, but exact service life will still depend on local exposure and maintenance.
For mechanical performance and knot behavior, review fixed knot versus hinge joint fence designs to align coating choice with wire construction type.
Fixed-knot high tensile fence (固定节点高张力围栏) typically combines heavy-duty knots with Class 3 or Zn–Al coatings to maximize both mechanical and corrosion performance in cattle systems.
3. Overlooking Soil & Post Foundation
3.1 Mistake Description
Another widespread mistake is specifying wire based on height and strength while treating posts and foundations as generic, without checking soil type, frost conditions, or drainage along the fence line.
This leads to the same post depth and footing detail being used in clay, sand, and rocky soils, even though their bearing capacity, frost susceptibility, and water behavior are very different in practice.
3.2 Why Soil Matters (Engineering Insight)
Soil bearing capacity, frost action, and drainage control post pull-out resistance, long-term alignment, and the ability of the system to hold tension without excessive movement.
Clay soils can swell when wet and shrink when dry, sand offers low lateral confinement, and rocky soils provide excellent stability but require more effort to excavate; each condition demands a different embedment strategy for posts carrying cattle fence loads.
In cold regions, frost heave (冻胀) can jack posts upward over repeated freeze–thaw cycles if they are not set below the local frost line, compromising both line tension and gate operation.
3.3 Consequences
Field observations and installation studies consistently show much higher failure rates when post embedment is shallow (for example, under about 24 inches for typical agricultural heights), especially in moderate wind, animal, or snow loading.
Shifting or tilting corner assemblies reduce wire tension, induce sagging, and transfer load to line posts that were not designed to act as primary anchors.
In poorly drained areas, standing water around posts accelerates decay of timber and corrosion of steel components, bringing forward the timing of expensive foundation repairs or replacements.
3.4 Avoidance Strategy
Start with a soil assessment, then design embedment depth, backfill, and drainage to match conditions instead of applying a single depth rule everywhere.
NRCS and extension fence standards commonly recommend burying posts roughly one-third of their total length or at least slightly below the local frost line, whichever is deeper, and explicitly call for deeper, heavier posts at corners and pull assemblies.
In clay soils, adding a gravel layer at the base of the post hole and ensuring positive drainage away from the fence line helps manage swelling and saturation, while in sandy soils, deeper embedment and concrete collars are often needed to prevent posts from loosening.
Refer to proper woven cattle fence installation for step-by-step post setting, bracing, and wire attachment details that are compatible with woven cattle fence systems.
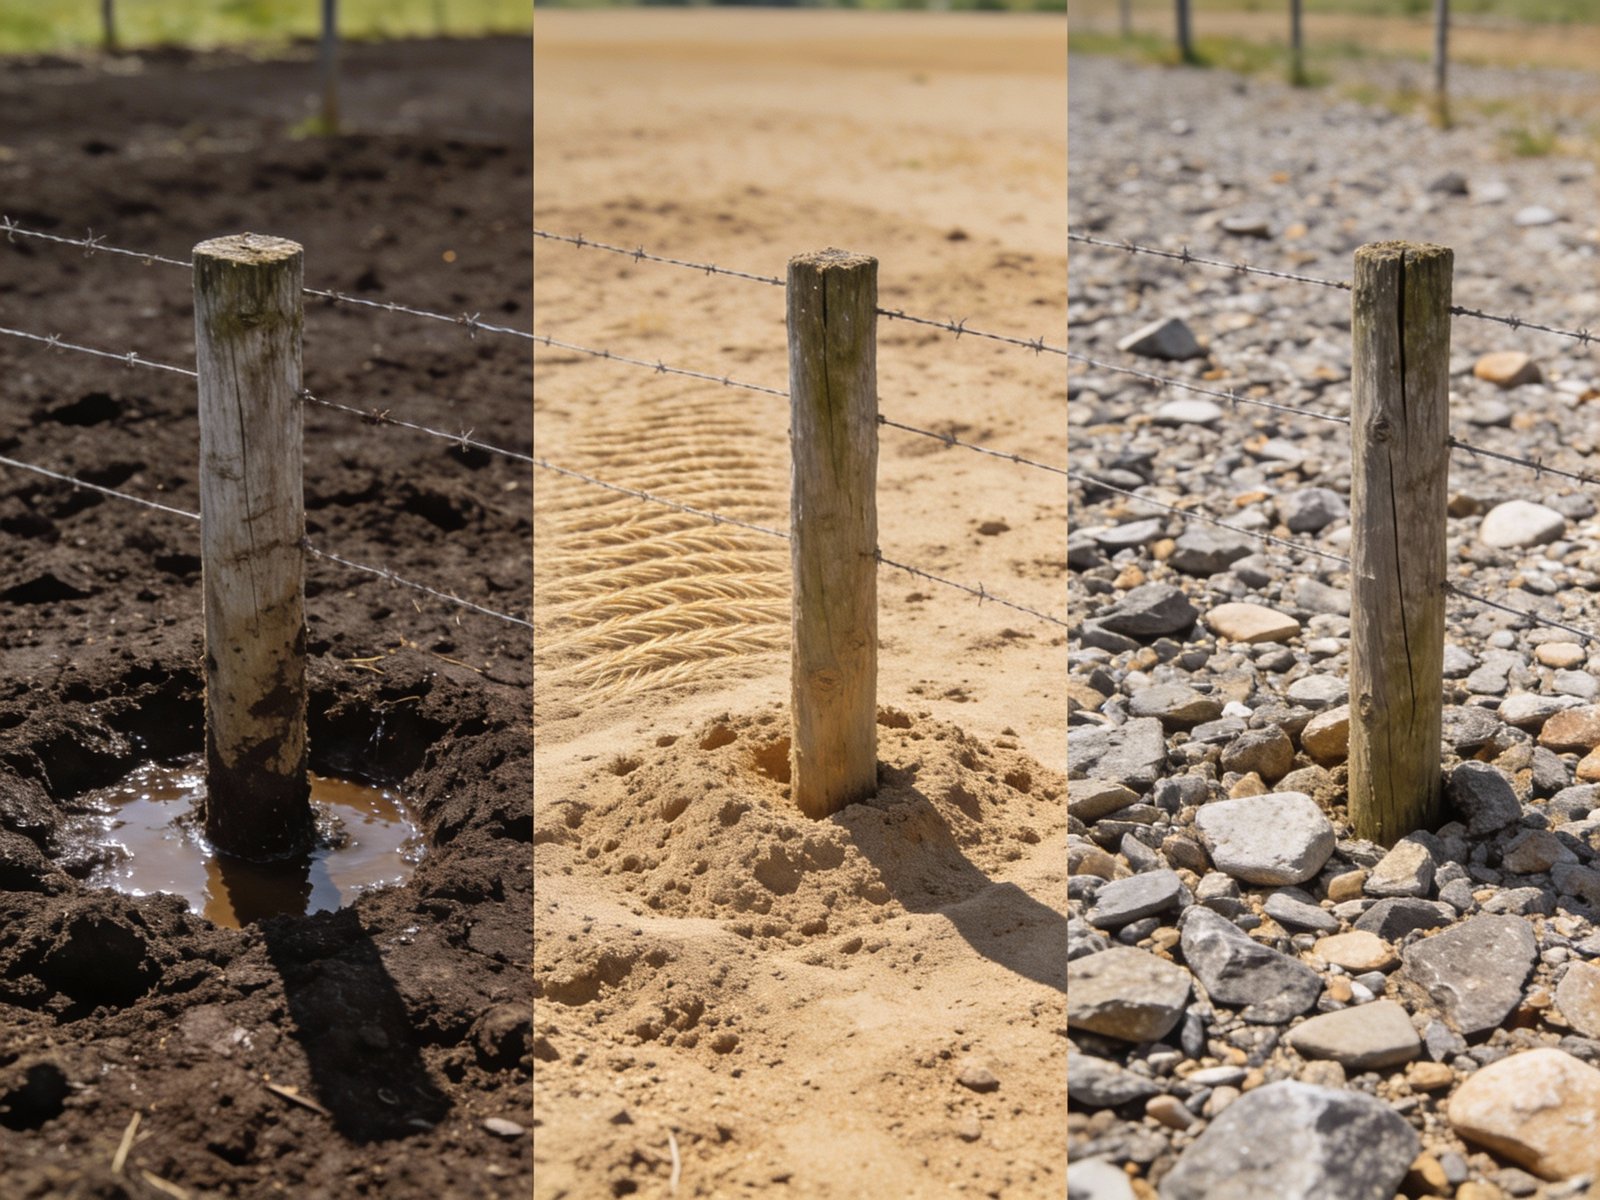
Swelling–shrink cycles around posts require deeper embedment and drainage management.
Loose structure often needs concrete or larger diameter posts to resist pull-out.
Guidance typically calls for posts at least several inches deeper than local frost depth to reduce frost heave effects.
Frost heave (冻胀) describes the upward movement of soil and embedded posts when moisture freezes and expands, then “ratchets” structures out of the ground over repeated freeze–thaw cycles.
4. Using One Tension Setting for All Climates
4.1 Mistake Description
Setting a single tension value (for example, 250 lb) at installation and assuming it will be correct year-round ignores how strongly steel wire length and stress respond to temperature changes.
This “set-and-forget” approach is especially risky for long runs of high tensile cattle fence, where cumulative thermal movement can be significant between winter lows and summer highs.
4.2 Technical Reason
Steel has a well-characterized coefficient of thermal expansion, so a given change in temperature produces a predictable change in wire length and thus in tension if end points are fixed.
Extension engineering data for livestock fencing show that in typical high tensile systems, a 5 °C temperature change can produce on the order of 5 kg change in wire tension, independent of wire length, if there is no mechanism for movement or energy absorption.
If wire is fastened rigidly to line posts, thermal contraction in cold weather can drive tension above the safe working range of the wire or the brace system, while thermal expansion in heat can transfer excessive compressive loads into corner assemblies and posts.
4.3 What Happens
In cold conditions, wire contraction without relief can overload the steel, particularly at knots and splices, and contribute to brittle breaks or “mysterious” wire snaps that appear during or after cold snaps.
In hot conditions, excessive expansion can push on braces and corner posts, increasing the likelihood of post lean or brace wire loosening, especially where foundations were already marginal.
Even when overt failures do not occur, progressive brace movement (for example, small shifts at H-braces) reduces effective tension over the length of the fence, leading to sagging wires and less reliable cattle containment.
4.4 Correct Practice
Use tension indicator springs or similar energy-absorbing devices on each high tensile wire so thermal movement is taken up elastically rather than transmitted entirely into the steel and posts.
High tensile fence specifications from extension and NRCS commonly target wire tensions around 150–200 lb in typical cattle applications, with exact values adjusted for temperature and wire size, and recommend using tensioning hardware that allows seasonal retightening without damaging the coating.
In practice, installers often set slightly lower tension at the coldest expected installation temperature and then check and retension in spring or fall, rather than tightening to the absolute maximum on a cool day and letting summer heat push the system into overstress.
See proper woven cattle fence installation and proper fence installation tools and equipment for guidance on using in-line strainers, spring tensioners, and tension gauges with woven cattle fence systems.
For visual understanding of installation techniques, the following instructional video demonstrates positioning of tension springs, use of in-line strainers, and staged tightening along the run.
This video is provided for visual reference only. Installation requirements may vary based on local conditions, soil type, and fence design. Source: Educational extension content.
5. Neglecting Inspection & Maintenance Planning
5.1 Mistake Description
A frequent mindset is “install once and forget,” with no formal inspection schedule or budget for ongoing fence maintenance.
In reality, even well-designed cattle fences are repeatedly stressed by weather, livestock pressure, vegetation growth, and soil movement, so condition will drift unless you actively monitor and correct issues over time.
5.2 Why It Is Wrong
Corrosion, mechanical wear, and environmental loading accumulate gradually and often invisibly until a critical threshold is passed, at which point failures appear “sudden” even though the underlying damage developed for years.
Engineering literature on steel systems consistently cites corrosion as a dominant contributor to premature failure in agricultural and industrial environments, with multiple studies indicating that a majority of long-term failures originate from corrosion-related mechanisms rather than one-time overloads.
Severe pitting corrosion can locally reduce effective cross-sectional area by roughly 30–50% in worst-case pits, significantly compromising tensile capacity at those points and making them likely locations for fatigue or overload breaks.
5.3 Consequences
Without a maintenance plan, issues such as small brace movements, minor rust at water crossings, or early insulator cracking are often overlooked until they trigger more extensive failures, livestock escapes, or safety incidents.
Economic analyses of fencing show that repair events can consume a substantial share of replacement cost; a rough planning rule is that reactive repairs over the life of a poorly maintained fence may approach a quarter or more of full rebuild cost, especially where posts and braces have to be reset.
Conversely, well-maintained high tensile systems with appropriate coatings and hardware routinely deliver 20–30 years of service or more, particularly when vegetation is managed and drainage around posts is kept under control.
5.4 Prevention
Establish a simple but consistent inspection schedule tied to seasons and major weather events rather than waiting for visible failures.
Extension and industry guidance commonly recommend at least twice-yearly inspections (for example, spring and fall) for agricultural fences, with more frequent checks in coastal or high-corrosion environments and after severe storms or fire events.
A practical pattern is:
- Spring: Check post alignment after frost, retension wires, clear winter debris, verify electric fence grounding where applicable.
- Summer: Control vegetation, watch for over-tension from heat, confirm gates and hardware operate smoothly.
- Autumn: Inspect for corrosion, repair damage before winter, adjust tension ahead of freezing conditions.
- After extreme events: Walk lines after floods, wildfire, or high winds to identify compromised sections early.
Implement a basic log capturing inspection dates, observed issues, and repairs performed so you can identify recurring problem spots and plan proactive replacements instead of repeated emergency fixes.
For deeper routines and checklists, refer to your dedicated cattle fence maintenance and repair guide, and consider linking maintenance planning back into your original cattle fence wire buying guide so purchasing decisions anticipate long-term upkeep.
6. Using Steel Posts in Electric Fences
6.1 Mistake Description
Using conductive steel posts with electric fence wire and relying entirely on plastic insulators to prevent shorting is another recurring design error in cattle systems.
The attraction is understandable—steel posts are strong, widely available, and familiar—but in an electric system they introduce many additional failure points compared with non-conductive posts.
6.2 Why This Fails
Electric fences depend on the hot wire remaining insulated from all grounded components so that animals complete the circuit when they touch the wire.
When the wire is mounted on steel posts, any cracked, degraded, or dislodged insulator can create a low-resistance path from the hot wire to the post and then into the soil, bleeding off voltage and reducing the effectiveness of the system.
Polymer insulators are susceptible to UV degradation, mechanical damage, and contamination; over time, small cracks and surface films provide leakage paths even before a complete mechanical failure is obvious.
6.3 Consequences
In the field, many electric fence troubleshooting reports attribute weak or intermittent shocks to shorts at or near steel posts where insulators have failed or become contaminated by vegetation, dust, or moisture.
Diagnostic guidance from electric fencing manufacturers and extension publications notes that poor grounding and post-related shorts are among the most common causes of underperforming systems, often responsible for a large share of electric fence complaints.
6.4 Solution
Where feasible, use non-conductive posts (for example, treated wood or purpose-built composite/plastic posts) in electric cattle fences so that minor contact between wire and post does not immediately create a direct short to ground.
If steel posts must be used, specify high-quality, UV-stabilized insulators that are rated for the system voltage, install them according to manufacturer guidance, and include them explicitly in your inspection rounds for cracks, movement, and contamination.
Support this with a robust grounding system—extension guidelines often call for several feet of ground rod per joule of energizer output and spacing rods at least several meters apart—to ensure the design voltage is achieved even when conditions are dry.
For system-level design choices between physical barrier and psychological barrier approaches, see woven wire vs electric cattle fence systems, and align your post and insulator strategy with that choice.
7. Decision Checklist Before You Buy
7.1 Environment & Corrosion Checklist
- Classify your site as inland, humid, coastal, or chemically aggressive using local climate and management data.
- Confirm minimum coating classes from regional standards or extension/NRCS fence specifications.
- Decide whether standard Class 3 galvanizing is adequate or whether Zn–Al / Zn–Al–Mg systems are justified by exposure and expected life.
- Align wire construction (fixed-knot, hinge-joint, S-knot) with coating and cattle pressure; see fixed knot versus hinge joint fence designs for structural trade-offs.
7.2 Soil, Posts & Installation Checklist
- Identify dominant soil types along the route (clay, sand, loam, rocky) and adjust embedment depth and footing design accordingly.
- In frost-prone regions, determine local frost line depth from building codes or extension, and ensure posts are set at least slightly deeper than this level.
- Design corner and end braces using proven H-brace or similar configurations, with post sizes and spacing consistent with high tensile loads.
- Plan the installation sequence—post setting, bracing, wire layout, tensioning—around best practices from proper woven cattle fence installation.
7.3 Tension, Tools & Temperature Checklist
- Confirm wire tensile strength (e.g., ~170,000–200,000 psi for high tensile) and recommended working tension range from specifications or extension tables.
- Include tension indicator springs or equivalent hardware, especially on long high tensile runs exposed to wide seasonal temperature swings.
- Document installation temperature and tension settings so seasonal adjustments can be made deliberately rather than guesswork.
- Equip crews with appropriate non-brand-specific tools—post drivers, tensioners, wire spinners, crimp tools, and reliable tension gauges—aligned with proper fence installation tools and equipment.
7.4 Electric Fence–Specific Checklist
- Decide if the system is primarily physical (woven wire) or psychological (electric), or a hybrid, and choose post materials accordingly.
- Use non-conductive posts where possible for electric wires, or specify high-quality UV-stabilized insulators on steel posts with an inspection plan.
- Size the energizer appropriately for fence length and vegetation load, and design the grounding system to meet manufacturer and extension recommendations.
- Plan regular voltage testing along the line and at ground rods as part of your maintenance routine.
7.5 Maintenance & Lifecycle Cost Checklist
The following annualized cost examples assume stable labor rates, average maintenance frequency, and no catastrophic external damage (flood, wildfire, vehicle impact). Actual costs vary by region and management intensity.
Typical service life: roughly 10–15 years under moderate conditions with standard coatings.
Expected pattern: higher reactive repair workload and earlier need for major rebuilds where corrosion and post decay are not proactively managed.
High tensile, Class 3 coated fences are commonly planned for 20–30 years of service in university and NRCS designs under normal exposure.
Industry interviews and planning tools often frame annualized cost as substantially lower than low-carbon alternatives once life expectancy and lower maintenance are taken into account.
Zn–Al and Zn–Al–Mg coatings are typically rated for significantly longer life than conventional galvanizing in salt fog and cyclic corrosion testing, sometimes on the order of two to three times longer in comparative studies.
These systems may carry manufacturer warranties in the decades range, so they are often chosen for environments where replacement logistics or downtime are particularly costly.
When comparing options, combine specification data with your own labor rates and maintenance expectations, using tools like a fence installation cost and labor calculator to explore scenarios rather than relying only on upfront material price.
8. Why These Mistakes Keep Repeating
8.1 Systemic Patterns Behind Repeated Failures
Across regions and operations, similar fencing mistakes recur because decisions are often made as simple material purchases rather than as engineered system designs.
Price-only comparisons overlook coating class, soil conditions, livestock pressure, and maintenance burden, while many buyers underestimate how strongly environment and installation quality drive long-term performance.
By reframing cattle fencing as an integrated system—wire, posts, soil, climate, tension, and inspection—rather than just “rolls and posts,” you can break these patterns and design fences that fail far less often and cost less per year of service.
9. Summary & Next Steps
9.1 Key Engineering Takeaways
Cattle fence wire buying mistakes are predictable because they follow clear engineering mechanisms: mismatched coatings in corrosive environments, under-designed foundations in challenging soils, unmanaged thermal stress, and neglected maintenance all shorten fence life in consistent ways.
The most robust systems start with correct environmental matching, suitable coating class, soil-appropriate post design, tension logic that accounts for temperature, and a realistic inspection and maintenance plan.
For different stock classes and pressure levels, combine this page with livestock-specific guidance such as cattle fence wire by livestock type, then refine wire construction and height decisions accordingly.
9.2 Recommended Reading Path
To put these ideas into practice with a full system plan:
- Start with regional standards and your own comprehensive cattle fence wire buying guide to define objectives, layouts, and baseline specs.
- Use the environment-focused cluster page at cattle fence wire by environment to refine coating and material choices for your climate and exposure.
- Follow the step-by-step instructions in how to install woven cattle fence wire to execute posts, braces, and tension correctly in the field.
- Plan and budget long-term upkeep using the cattle fence maintenance and repair guide, and use the fence installation cost and labor calculator to explore lifecycle cost scenarios.
This page synthesizes guidance from NRCS fence specifications, university agricultural extension publications (Oklahoma State, Missouri, Wisconsin, and others), ASTM coating standards, and peer-reviewed corrosion engineering literature. Numbered citations refer to technical sources collected during research and are available upon request for verification.